Intro:
Exciting News for Horizon Cloud Services Users!
If you haven’t heard yet, Horizon Cloud Services (HCS) now includes a powerful feature that lets you deploy a Horizon Edge directly on your local vCenter cluster. This deployment automatically provisions managed Unified Access Gateways (UAGs)—and the best part? You no longer have to worry about upgrading them! With this setup, you can deploy, configure, and access VDI desktops on-premises without any Connection Servers.
Over the past few weeks, I’ve had the opportunity to dive into the new Horizon Edge Gateway and run extensive tests for Horizon Cloud Services for vCenter. This gateway is designed to enable Horizon Cloud functionality without the need for on-premises connection servers—a bold and exciting move by Omnissa.
I first explored this during the Beta phase a few months ago, but now that it’s Limited GA, it’s time to go all in! In this post, I’ll walk you through the build-out process, share my experience, and break down the pros and cons of this game-changing feature.
Lets dive into this!
Gaining Access to Horizon Cloud with On-Premises connection to vCenter:
To access the new Edge Gateway, please submit a request to Omnissa Support to enable your tenant. This is the current process at the time of writing. In the future, tenant enablement will occur automatically by default.
Domains:
Logged into the Horizon Cloud Web portal, and going to “Integrations, and Choosing “Identity and Access”
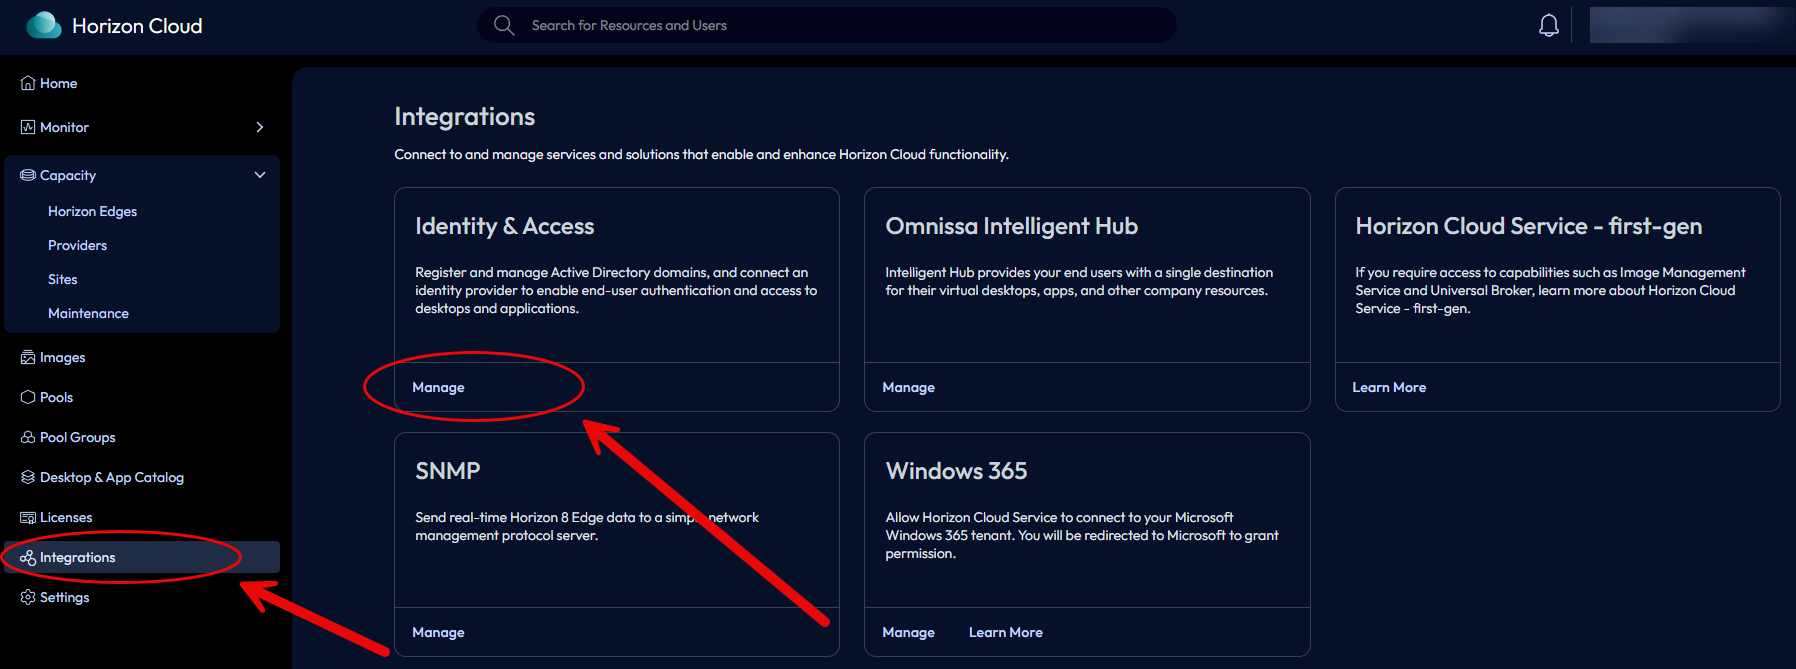
From the “Domains” tab, choose the Add button.
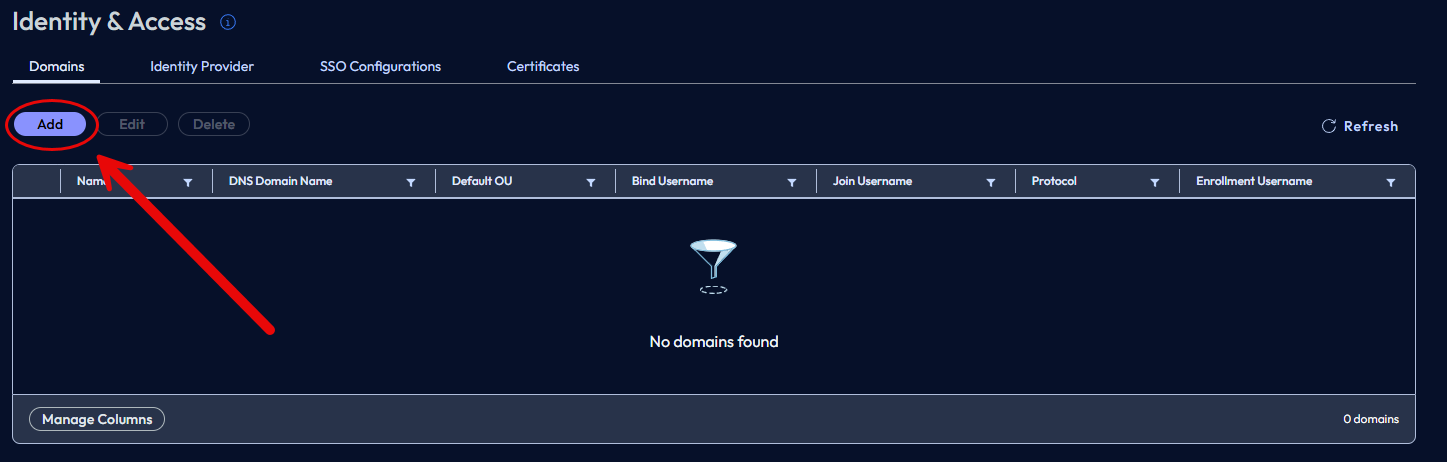
The add button will open new page. Lets work through this.
Domain Registration:
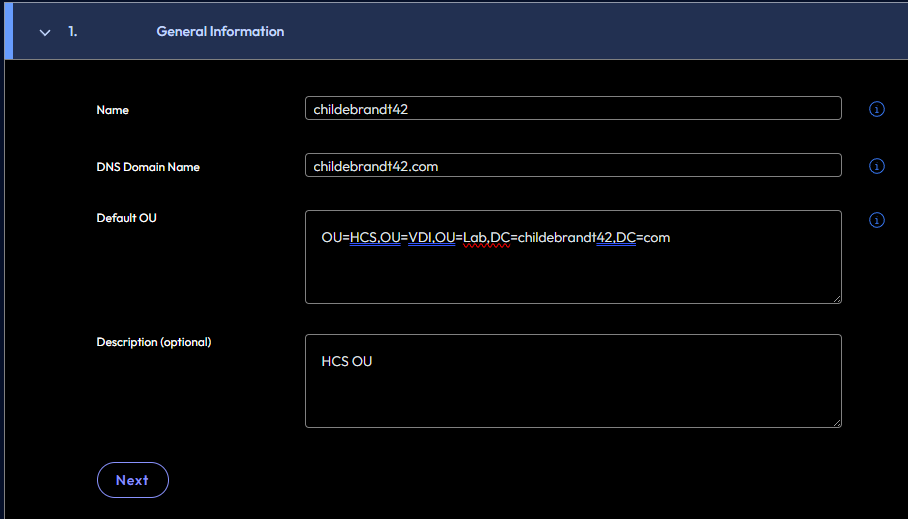
General Information:
Name = Enter your domain name.
DNS Domain Name = Enter your domain FQDN. Example childebrandt42.com
Default OU = Enter the default OU where you would like your VMs to be created in by default, You can put them other places this is just the default location when you go to create a pool.
Description = optional but put in what ever notes you want to. And click next.
Should look like this except your own information:
Domain Bind Accounts:
There are two Domain Bind Accounts required, these accounts just need normal user rights, but do need passwords that DO NOT EXPIRE!
Enter your domain bind accounts and passwords in the fields like below, but again with your own info.

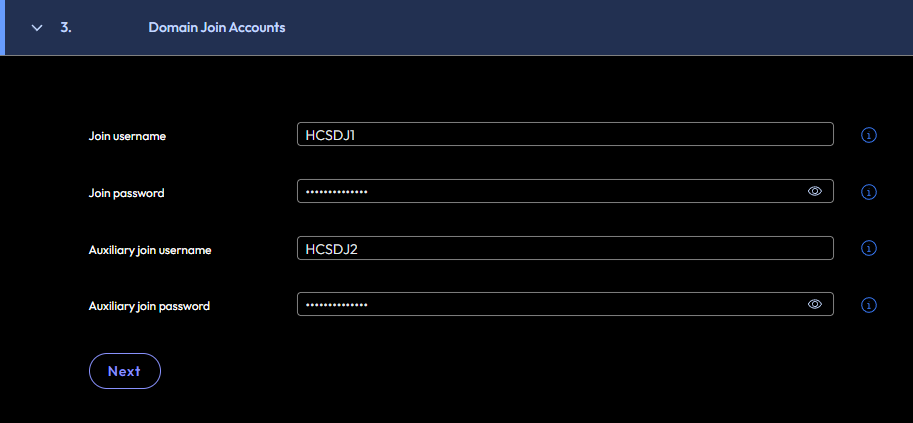
Domain Join Accounts:
Like the Domain Bind accounts, There are two accounts required for the Domain Join section. There are a few ways you can do this, but RBAC version of this is to create two normal user accounts with passwords that DO NOT EXPIRE!
To Give Service Accounts rights to Join Computers to the domain to a specific OU. Please look at the blog post I wrote here.
Back to the Horizon Cloud Console under Domain Join Accounts enter your account info for the Domain Join Accounts like below, and click next.
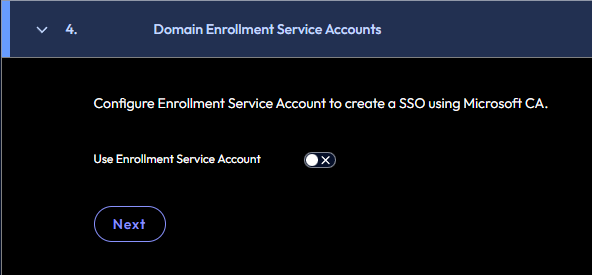
Domain Enrollment Service Account:
If you are intending on setting up SSO to use Internal TrueSSO configuration, you need to configure a this section, if you do not intent to use the on Premises TrueSSO configuration you can skip this part, and hit next. If you need some more info on the options look below in the SSO Section.
Next is not using On-Premises TrueSSO
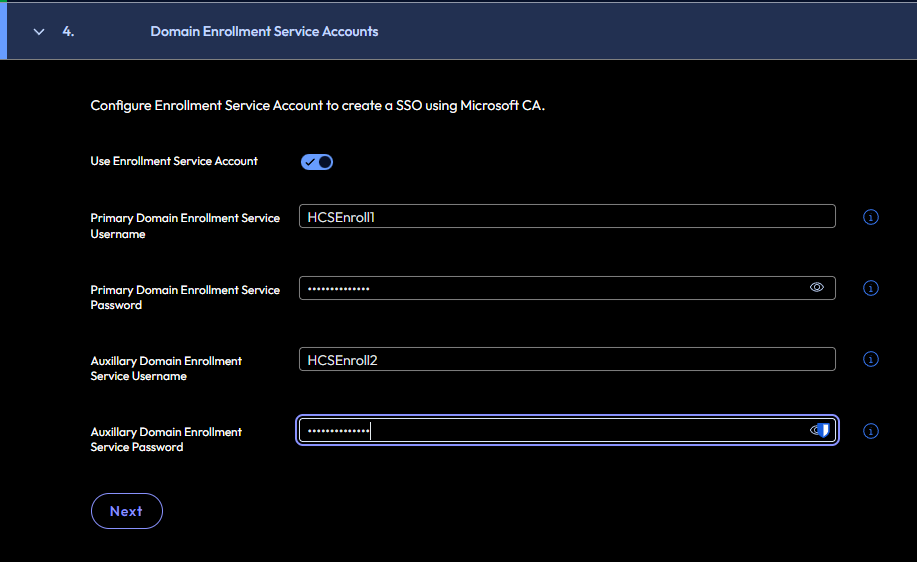
If using On-Premises TrueSSO, we need the following two Service accounts with NON EXPIRING Passwords, the two service accounts will need rights to “Enroll” your TrueSSO certificate template. Either by AD group or adding them to the rights of the certificate template.
Enter the Enrollment Service Accounts like below and click next.
Protocol:
In the “Protocol” section, If you are using LDAP, I would strongly urge you to configure LDAPS, so your LDAP traffic is encrypted! We are not even going to cover LDAP, so to configure LDAPS. In the protocol drop down choose LDAPS.
On the “Certificate File” Select Browse and select your LDAPS certificate file for each of your Domain Controllers one at a time. For my example im only using one DC. Once you select it, click the “Upload” button.
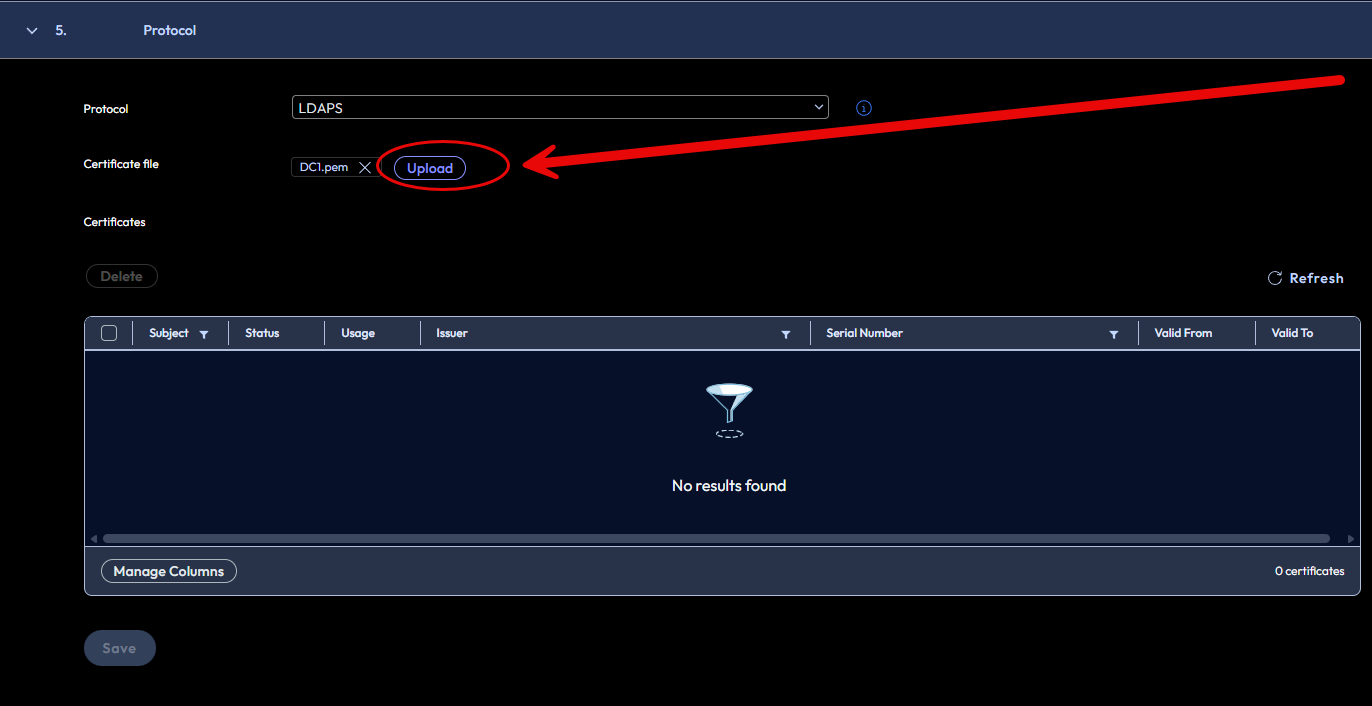
Should look something like below, and click Save.
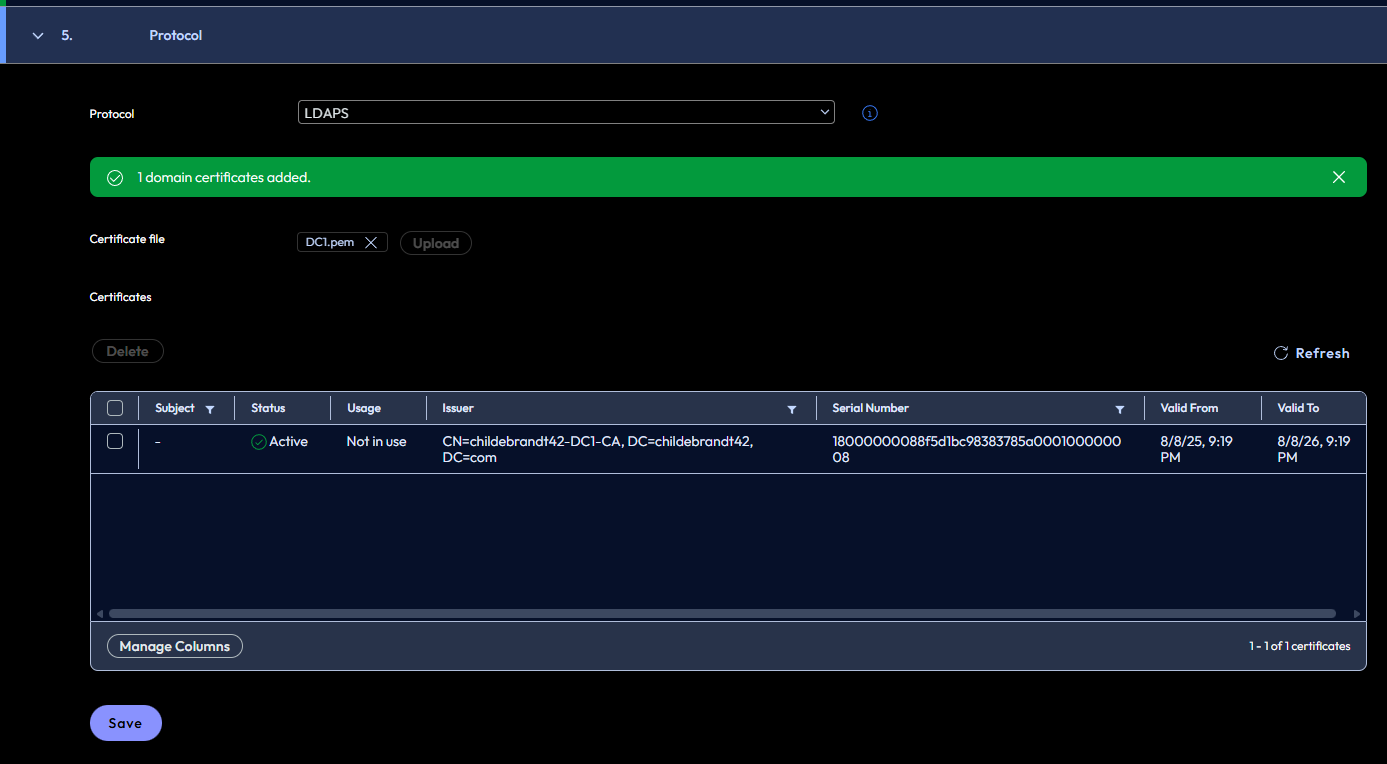
Now your Domain is configured. and it should look like below.

Identity Provider:
Logged into the Horizon Cloud Web portal, and going to “Integrations, and Choosing “Identity and Access”
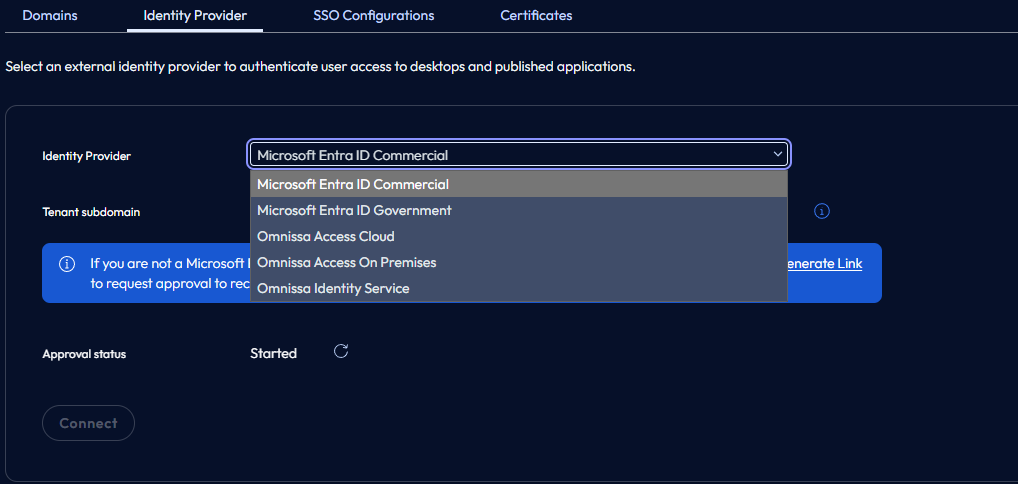
Go to the “Identity Provider” Tab. On this tab we have some options for Identity Provider.
* Microsoft Entra ID Commercial
* Microsoft Entra ID Governmental
* Omnissa Access Cloud (Workspace One Access Cloud)
* Omnissa Access On Premises (Workspace One On Premises)
* Omnissa Identity Service
Lets go through our Options:
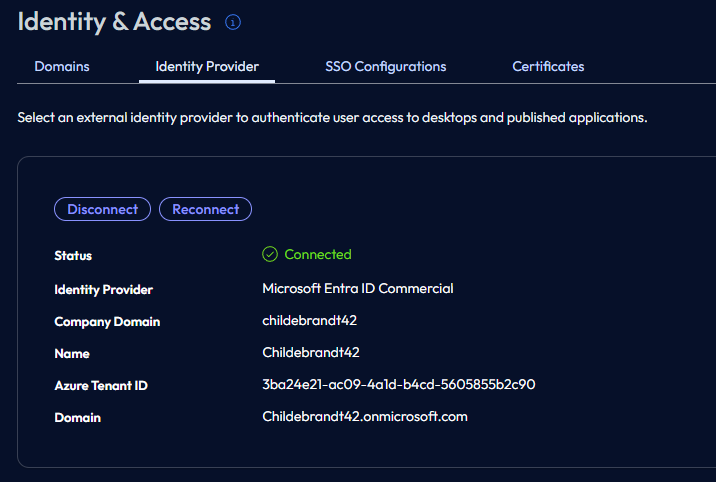
Microsoft Entra ID Commercial and Governmental (Both same process:
This is typically the most common option most people will be deploying.
Tenant Subdomain – enter your domain (Example: childebrandt42)
Click the “Connect” button
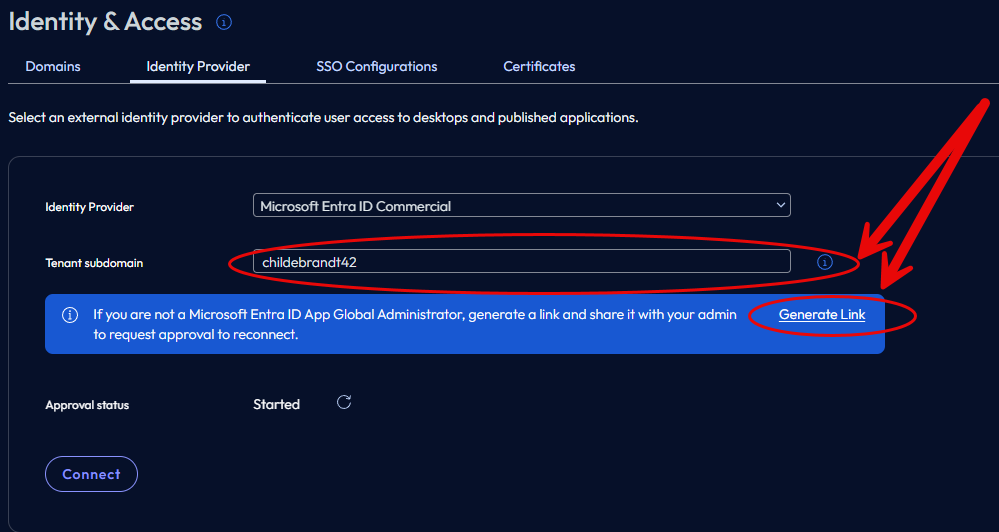
When you sign into Entra you must be a member of “Global Administrators” group for permissions to take. This is what i have found in my deployments of this. When ever you send a link it seems like most of the time it does not work properly by the generate link option. I have found the most common way to do this is talk to your Global Admin setup a screen share and have them sign into your machine or the other way around to set this up. Once the GA signs in it will show a screen like below.
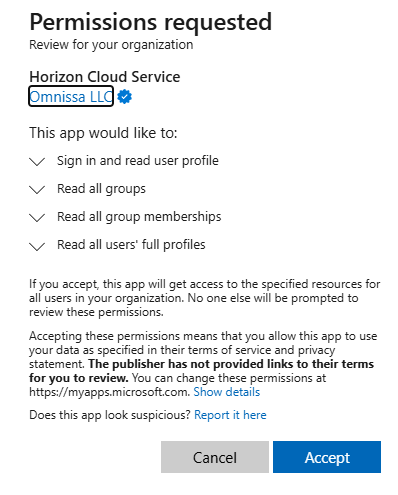
Once it finishes a bit on its end, you should have a screen that looks like this.
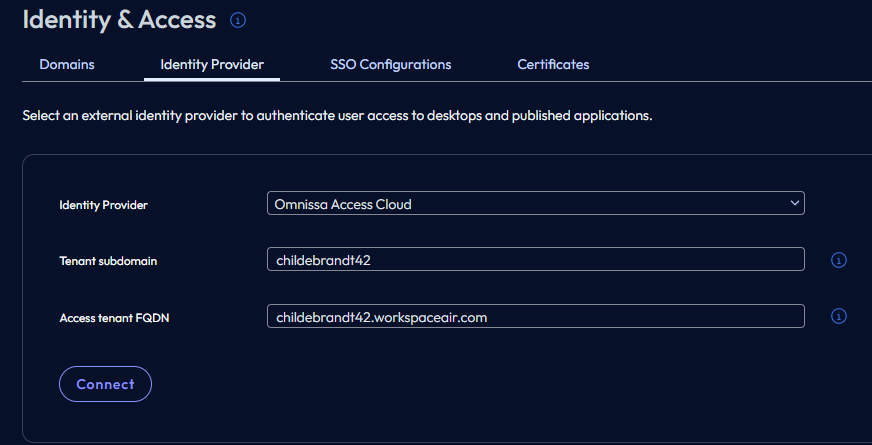
Omnissa Access Cloud (Workspace One Access Cloud):
Probably the second most common options configured.
Fill out the fields for:
Tenant Subdomain – for me it will be “Childebrandt42”
Access Tenant FQDN – for me it will be “childebrandt42.workspaceair.com”
It will look something like this, and then click connect.
Omnissa Access On Premises (Workspace One On Premises) (Im sorry no one wants to maintain that):
Tenant Subdomain – for me it will be “Childebrandt42”
Access Tenant FQDN – for me it will be “WS1.childebrandt.com”
Client ID – Your OATH client ID you configured for your On Prem Workspace One Access.
Client Secret – Your Client Secret.
I do not have this configured in my lab as im not a masochist so here is a screenshot of the fields, and then click connect.
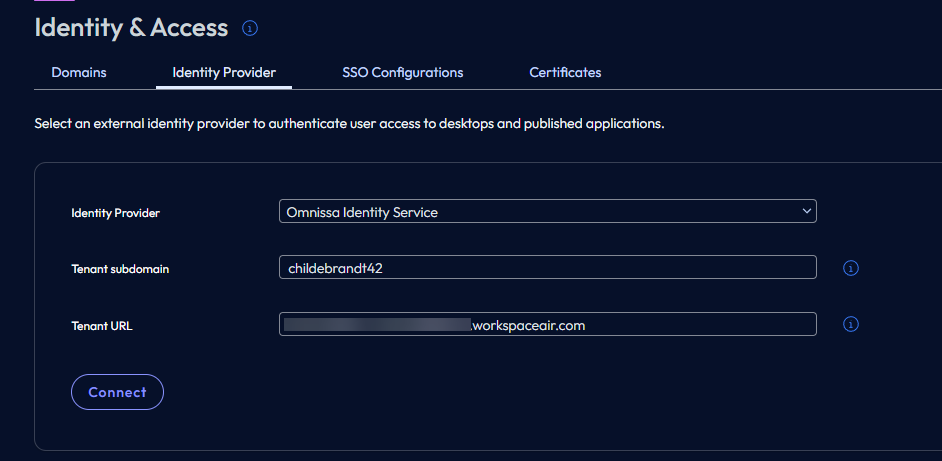
Omnissa Identity Service:
Not sure why this is not more common yet, other than its a migration process, but would urge you to go this direction if you are building new Horizon Cloud Deployment. (Except SSO does not work for the Desktops as of the time of writing this blog article.)
Fill out the fields for:
Tenant Subdomain – for me it will be “Childebrandt42”
Access Tenant FQDN – for me it will be “Somedomainstuff.workspaceoneaccess.com”
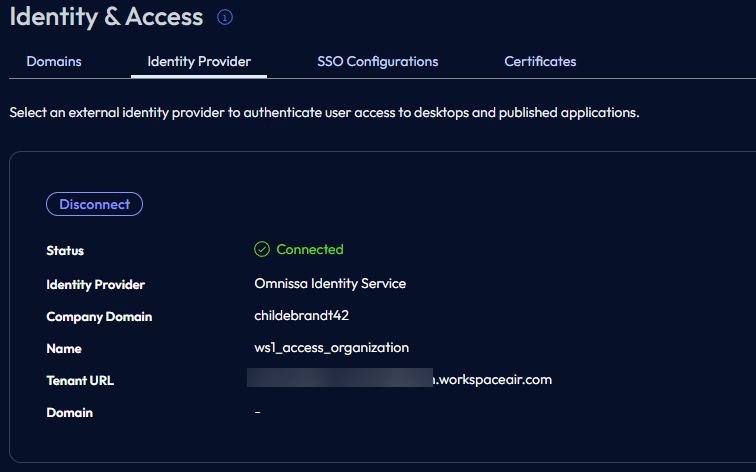
In completing this it should look like below in the “Identity Provider” tab.
SSO Configurations:
In todays configuration of Horizon Cloud there are two options for SSO configuration, first is “Horizon Cloud CA” and second is “Microsoft CA” Lets jump into some details of them.
Horizon Cloud CA
- What it is:
Horizon Cloud CA refers to the certificate authority service built into the Horizon Cloud control plane. It is managed by VMware (Omnissa) and does not require you to deploy or maintain your own CA infrastructure. But if you have your own CA infrastructure you can use the Horizon Cloud CA can operate as a Sub-CA for your On-premises Microsoft CA. - How it works:
- The Horizon Cloud service issues and manages the short-lived certificates needed for True SSO.
- No on-premises Enrollment Server or Microsoft CA setup is required.
- Benefits:
- Simpler setup – No need to install and configure Active Directory Certificate Services (AD CS).
- Lower operational overhead – VMware handles certificate lifecycle.
- Ideal for cloud-first deployments where you want minimal infrastructure.
- Concerns:
- Subordinate Certificate Authority (Sub CA) – If configuring to work with existing Active Directory Certificate Services (AD CS), The Edge gateway will be a Sub CA for your On-premises CA, and will issues certs from the Edge.
Microsoft CA
Supports enterprise security standards and compliance requirements.
What it is:
This option uses your Microsoft Enterprise Certificate Authority (AD CS) running in enterprise mode to issue certificates for True SSO.
How it works:
You configure Horizon Cloud to integrate with your Microsoft CA.
Requires creating certificate templates (Enrollment Agent and Smart Logon) and setting up domain enrollment service accounts.
In first-gen Horizon Cloud, you also needed an Enrollment Server installed on-premises to handle certificate requests. In next-gen Horizon Cloud, this functionality is hosted in the cloud, reducing complexity.
Benefits:
Full control over certificate issuance and policies.
Better fit for hybrid environments where Microsoft CA is already in use.
Crating SSO Configuration:
Logged into the Horizon Cloud Web portal, and going to “Integrations, and Choosing “Identity and Access”
Once in Identity and Access,
Creating the edge:
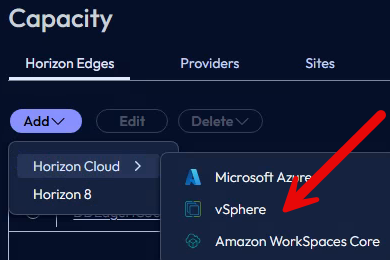
Following the prompts in the Horizon Cloud Management portal, going to Capacity, and Horizon Edges, clicking the Add button, and choosing “Horizon Cloud” then “vSphere”. No there is no solution for Nutanix at this moment either.
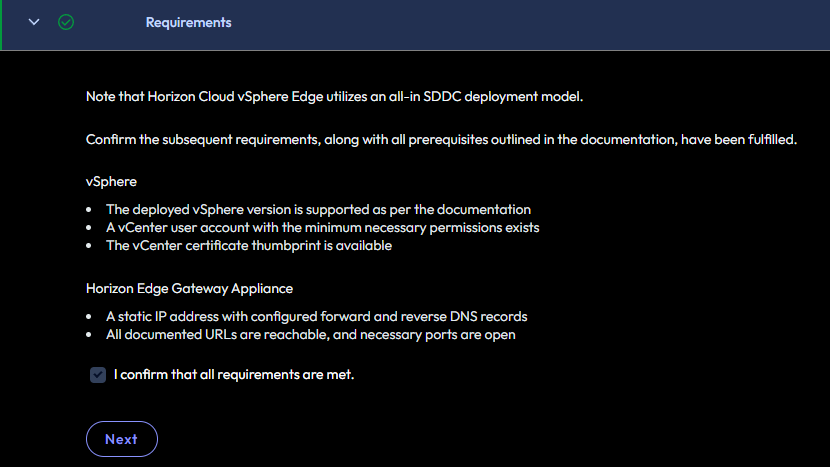
Requirements:
On the requirements screen please make sure you understand that the IP address and Forward and Reverse lookup DNS records are required to build out edge and ensure it works properly. Well because we always know its the network people, but when its not, its DNS but still network people.
Also ensure you have a vCenter service account with the proper permissions for vCenter service account:
Instant Clone:
Minimum vCenter Server Privileges for Horizon Administrator Role (Instant Clones)
Minimum vCenter Server Privileges for Horizon Administrator Role (Instant Clones)
Privileges to Enable Alarms
- Alarms
- Disable or enable alarm on entity
- Cryptographic Operations (Required for VMs with vTPM device)
- Clone
- Decrypt
- Direct Access
- Encrypt
- Manage KMS
- Migrate
- Register Host
- Datastore
- Allocate space
- Browse Datastore
- Low-level file operations
- Folder
- Create folder
- Delete folder
- Global
- Act as vCenter Server
- Disable methods
- Enable methods
- Manage custom attributes
- Set custom attribute
- Host
- In Configuration
- Advanced Settings
- In Inventory
- Modify Cluster
- In Configuration
- Network
- Assign network
- Profile Driven Storage (vSphere 7.x and earlier)
- All (if using vSAN datastores or Virtual Volumes)
- Resource
- Assign virtual machine to resource pool
- Storage Views
- Not required
- Virtual Machine
- In Change Configuration
- Acquire disk lease
- Add existing disk
- Add new disk
- Add or remove device
- Advanced configuration
- Change CPU count
- Change memory
- Change resource
- Change settings
- Change swapfile placement
- Configure Host USB device
- Configure managedBy
- Configure Raw device
- Display connection settings
- Extend virtual disk
- Modify device settings
- Query Fault Tolerance compatibility
- Query unowned files
- Reload from path
- Remove disk
- Rename
- Reset guest information
- Set annotation
- Toggle disk change tracking
- Toggle fork parent
- Upgrade virtual machine compatibility
- Edit Inventory
- Create from existing
- Create new
- Move
- Register
- Remove
- Unregister
- In Interaction
- Connect devices
- Perform wipe or shrink operations
- Power off
- Power on
- Reset
- Suspend
- In Provisioning
- Allow disk access
- Clone template
- Clone Virtual Machine
- Customize
- Deploy template
- Promote Disk
- Read customization specifications
- In Snapshot Management
- Create snapshot
- Remove snapshot
- Rename snapshot
- Revert snapshot
- In Change Configuration
- VM Storage Policies (vSphere 8.x and later)
- Update VM storage policies
- View VM storage policies
- vSphere Tagging
- Assign or Unassign vSphere Tag
- Assign or Unassign vSphere Tag on Object
- Create vSphere Tag
- Create vSphere Tag Category
- Delete vSphere Tag
- Delete vSphere Tag Category
Minimum vCenter Privileges to Deploy OVF/OVA
- Minimum vCenter Privileges to Deploy OVF/OVA
- To successfully deploy an OVF or OVA template in vCenter, the user’s role must include these permissions:
- Datastore
- Allocate space
- Network
- Assign network
- vApp
- Import
- Virtual Machine
- Edit Inventory
- Create new
- Configuration
- Add new disk
- Advanced
- (Optional for customization) Change memory, CPU count, Modify device settings
- Interaction
- Power on / Power off (if you want to start the VM after deployment)
Lets Deploy this thing!
General Information:
Enter your Horizon Edge Name, and Description if you like.

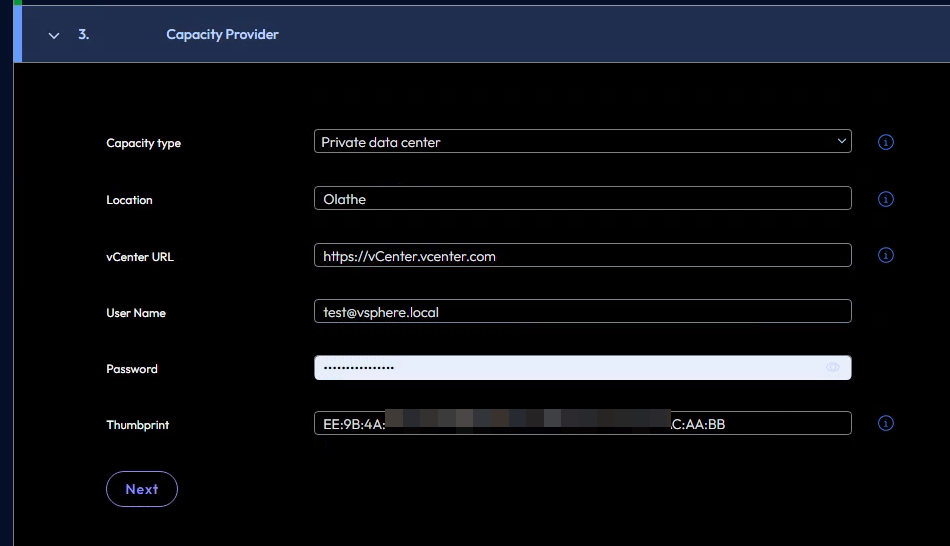
Capacity Provider:
Fill out all the fields to match your environment:
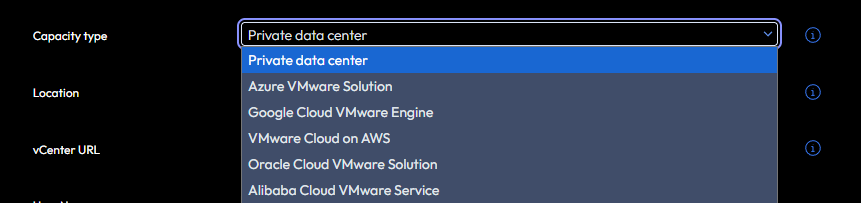
Capacity Type:
For capacity type choose “Private Data” if deploying on premises. If not you have a few options if you are deploying on other clouds.
🚨Location 🚨:
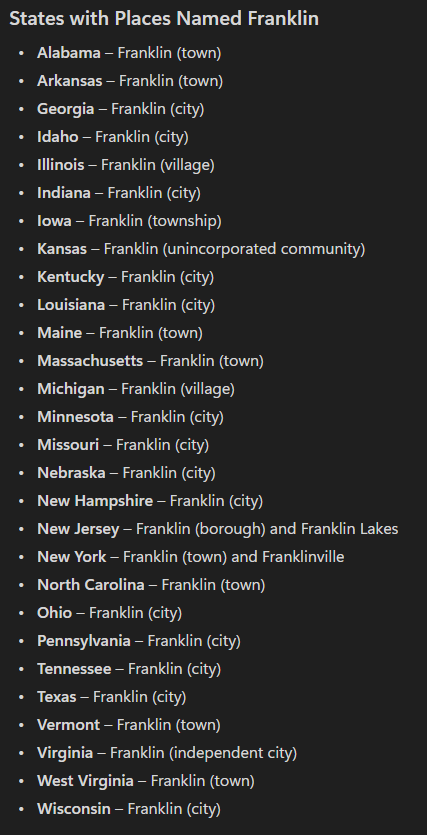
“Location” and this is something that I have complained about for many years in the V2 version of the cloud. The issue is when you put in your city let’s say “Franklin” It gives a list like below:
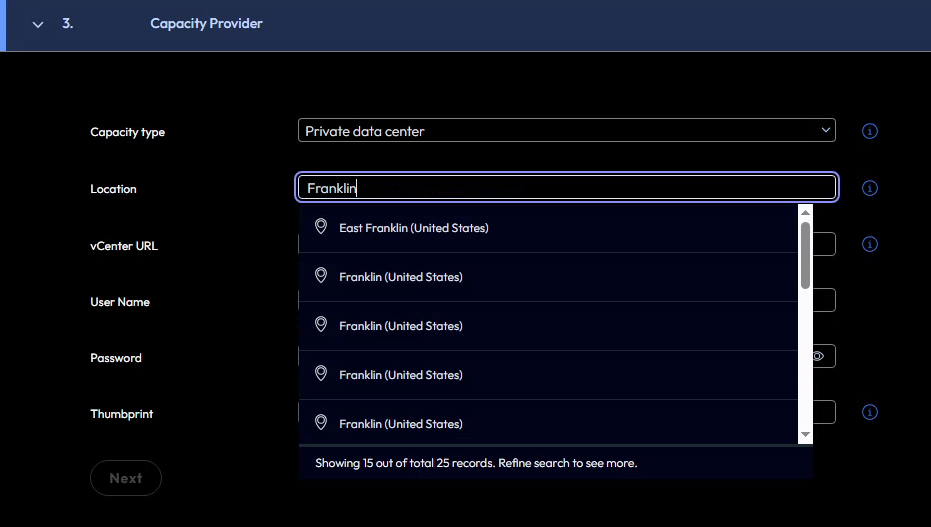
But guess what there are 28 cities in the US named Franklin according to Copilot, but this is only showing 15. How do you know what one you are choosing, is your Franklin in Alabama? Is it in Indiana or maybe Iowa? I know its more the region info, but still make it useful to choose the actual location from the list.
Other wise you are playing google your location and look at it alphabetically.
I do want to call out, I have had many calls with Omnissa, and they are working on fixing this.
vCenter URL:
Enter the URL for your vCenter including “https://”
User Name and Password:
Enter Username and Password for vCenter Service account.
🚨IMPORTANT Password Issue🚨:
One thing to keep in mind on this screen is there is an issue with passwords for your service accounts. This is an undocumented bug at this moment of writing it, and just confirmed it a few hours ago. If your password has an “@” or a “#” you will run into a deployment issue with your UAG’s. At this moment of writing this blog, its a bug, but a fix is in place and should be out in the next few weeks.
Thumbprint:
🚨Warning on Thumbprint🚨:
Thumbprint field is something you need to input a Thumbprint from vCenter web cert, but wait, you can not use the SHA256 key, you must use the SHA1 version of the Thumbprint. So you need to follow the below directions to get the cert.
Getting Thumbprint from vCenter:
Go to the vCenter URL, and sign in, go to the upper right hand corner hamburger menu, click on it, go down to Certificate Management, then Find Machine SSL Certificate and click view details.
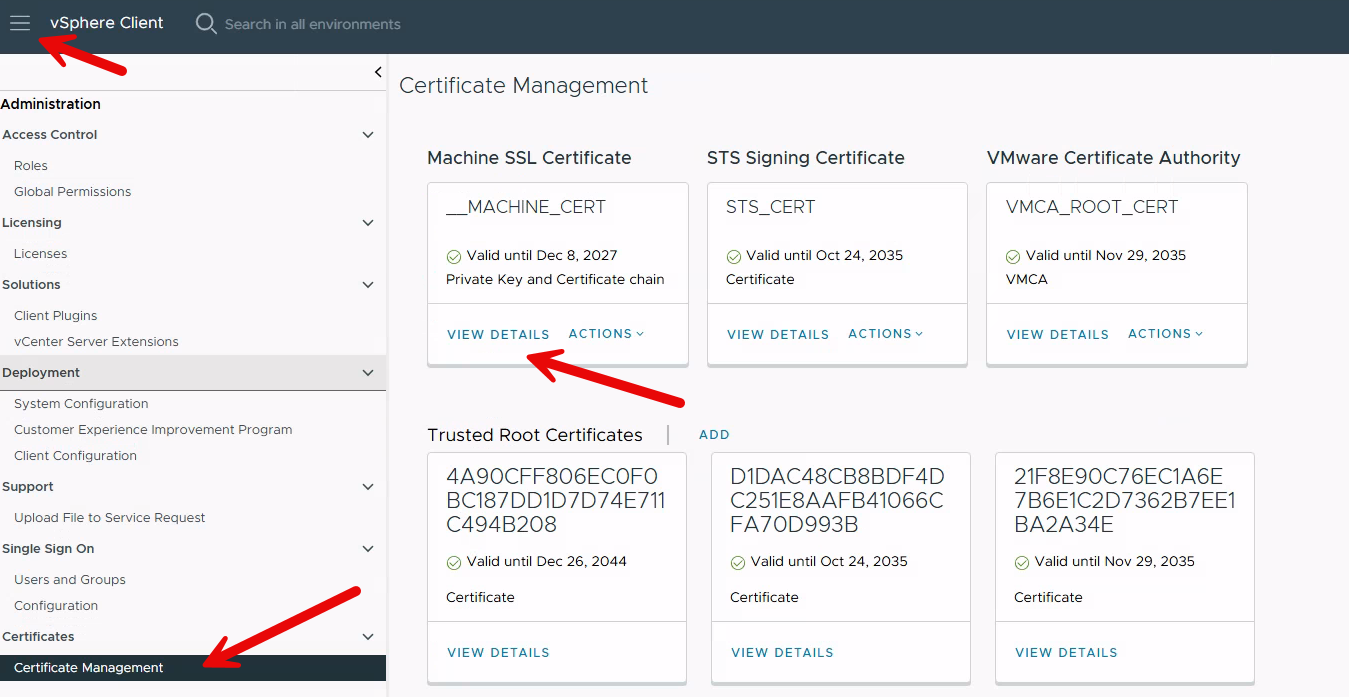
It should look like below:
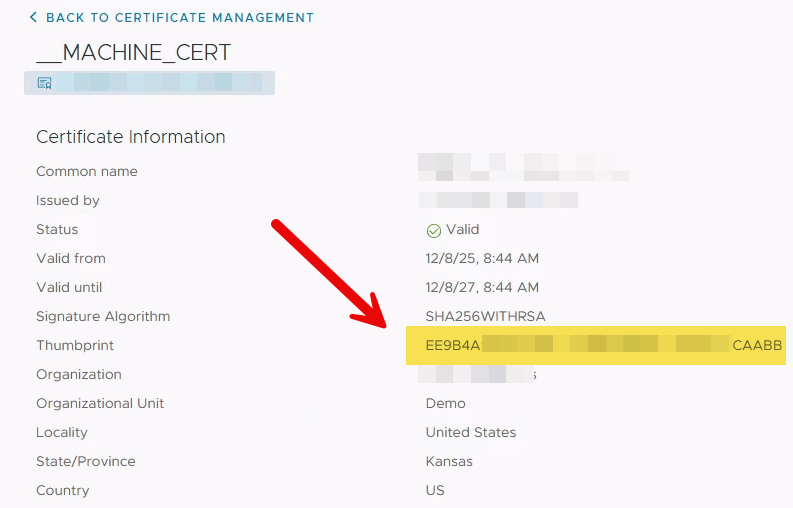
You need to copy the Thumbprint, but you need to edit it, you must put it in proper SHA1 format and put a “:” ever two characters, like xx:xx:xx:xx: and so on.
Then you can past it into Edge deployment tool.
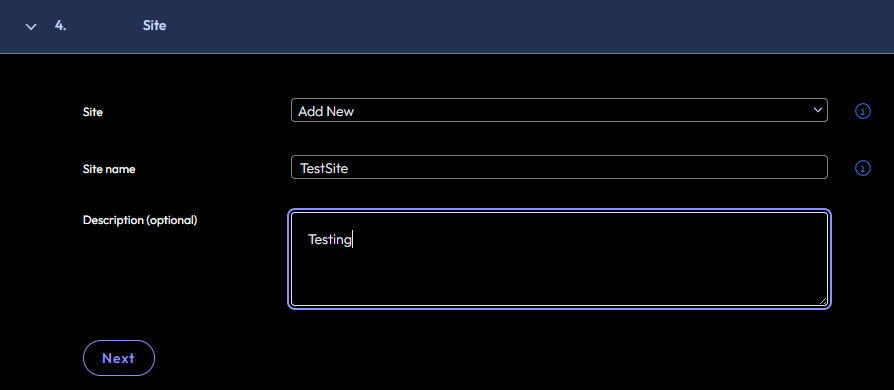
Site:
Click “Add New Site” and Enter the name of your Site Name and Description like below.
Horizon Edge Gateway:
FQDN: Enter the FQDN of the Edge Gateway that you created the Forward and Reverse DNS entry’s for.
Leave Agent Monitoring Enabled
Click the slider button to enable SSO and Choose the SSO Config we created earlier.
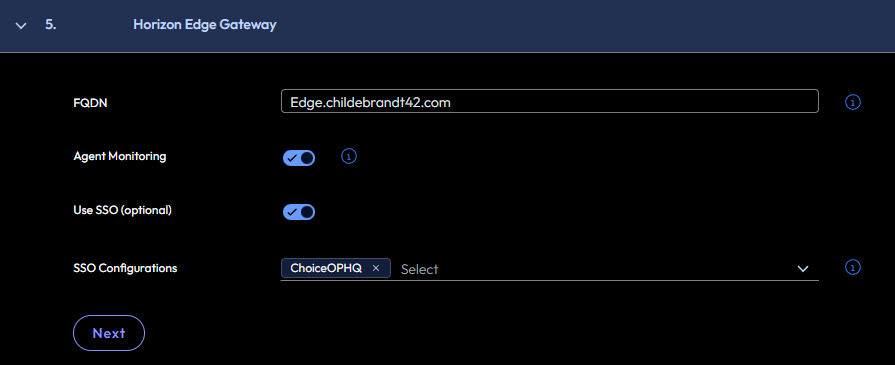
Upon clicking Next, it will generate the OVA for deployment. And will move you to the “OVA Appliance” tab.
OVA Appliance:
On the OVA tab, download the link.
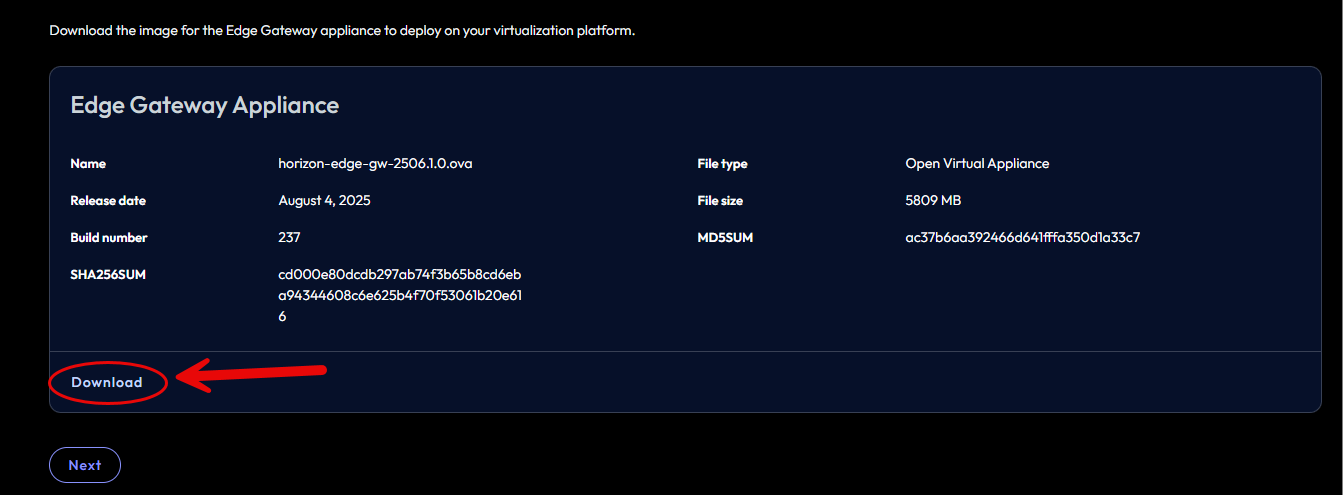
Once it finishes downloading and you are ready to deploy, click the next button.
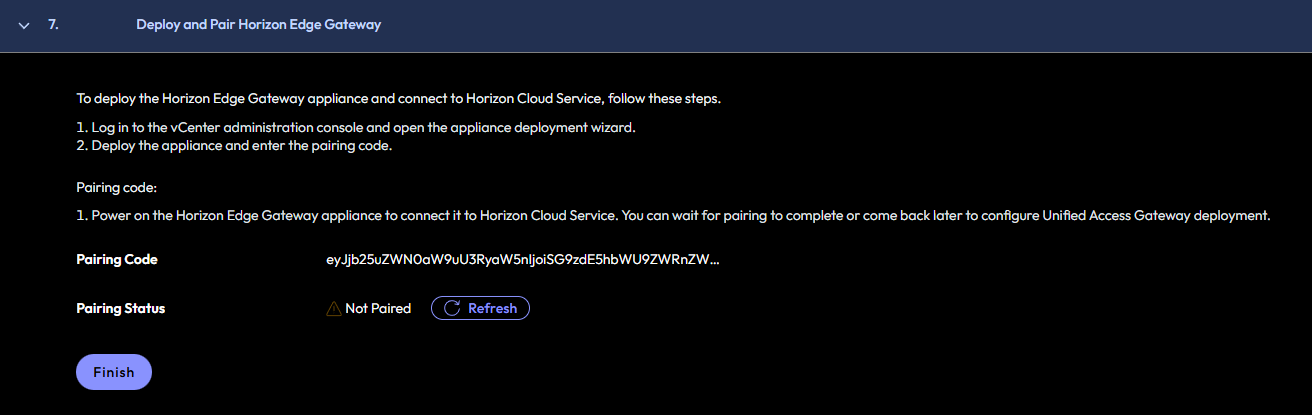
Deploy and Pair Horizon Edge Gateway:
On this tab, it will give you a “Pairing Code”. Take note of this, as this will be used in the OVA deployment.
You can click finish at this point, No need to keep this window open. Yes it will still pair.
Deploying the Horizon Edge Gateway OVA:
From with in the location of vCenter or AOS (Nutanix) in this example we are going to cover vCenter.
Pick the location where you plan to deploy the OVA, and right click and Deploy OVA. It will open windows like below, Click the Radial button next to local file.
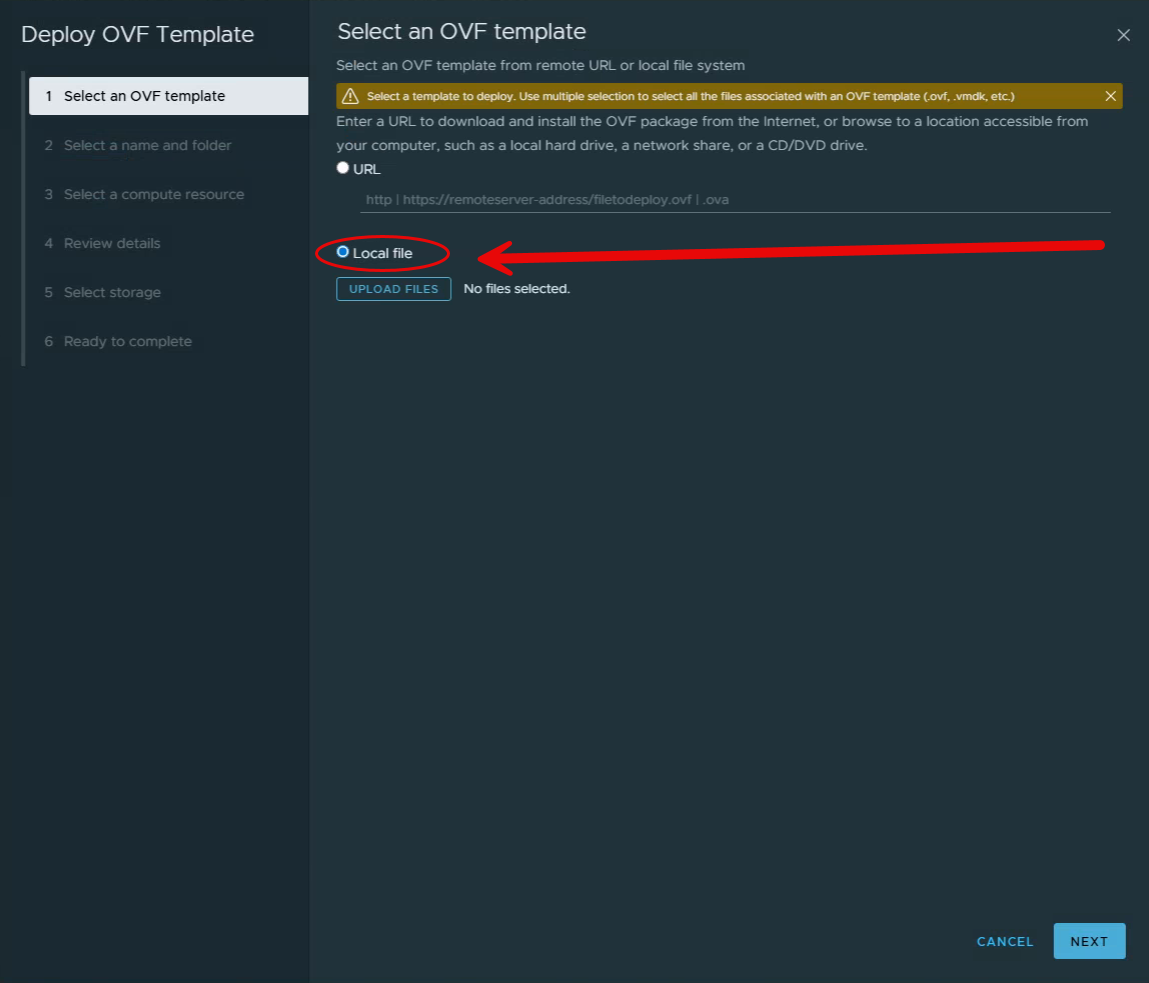
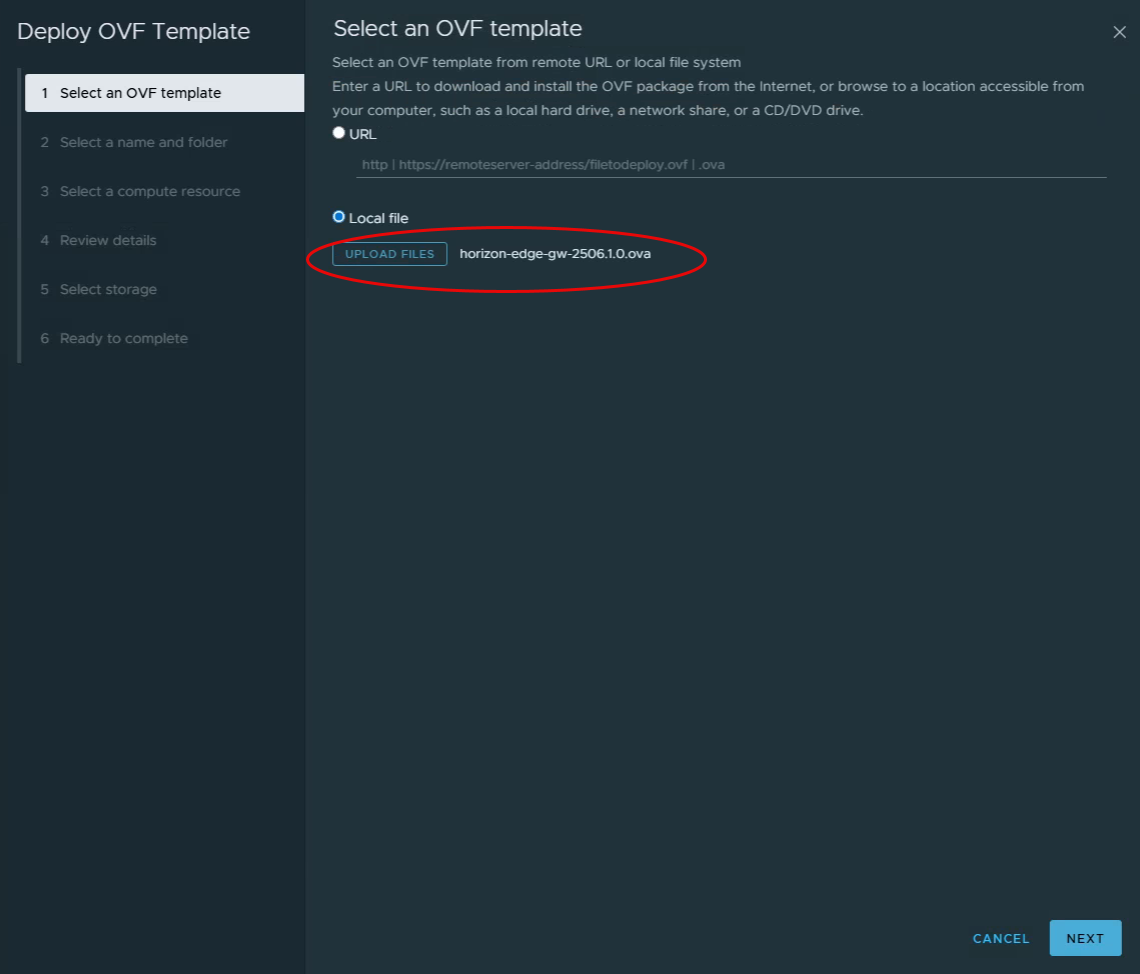
From there click upload files, and pick the location of your OVA, and select it, then click next. It should look like below.
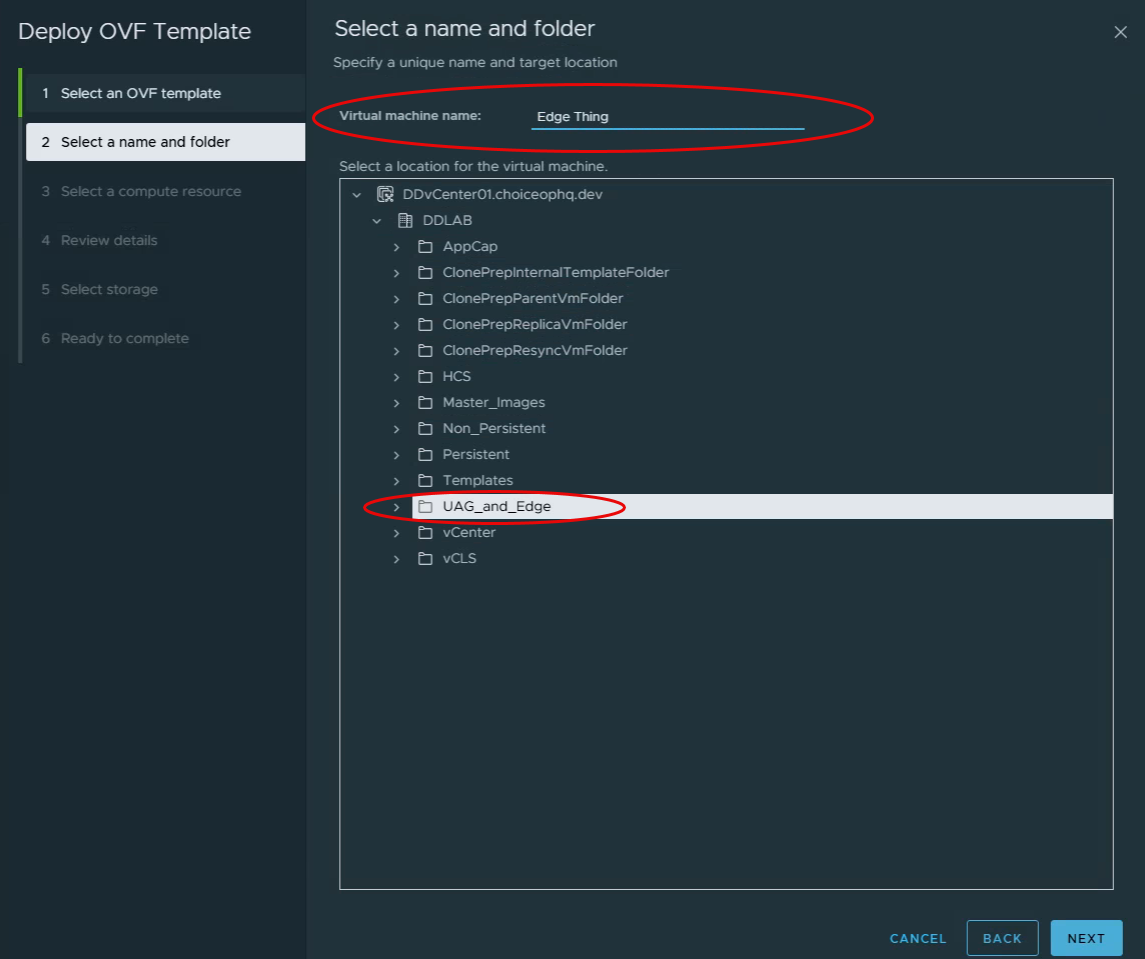
On the next window, Name the Edge Appliance in the Virtual Machine Name field, For my example I used “Edge Thing”, and then select the folder you want to deploy it in, click next.
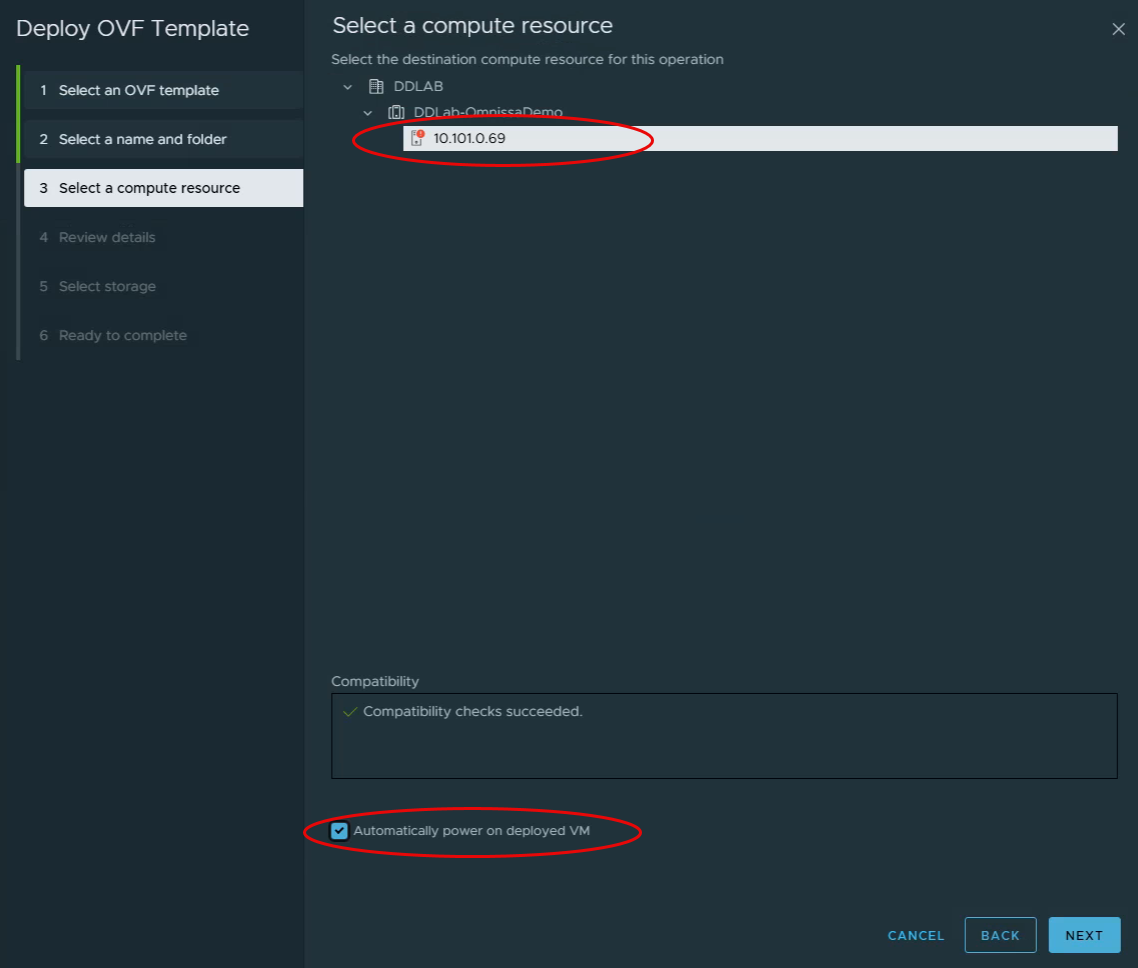
Select the Compute resource on this window, and select “Automatically power on Deployed VM” (This so you don’t forget as it takes forever to come to life) Then click next. (My example only has one host, so had to pick single node vs cluster as no DRS is configured.)
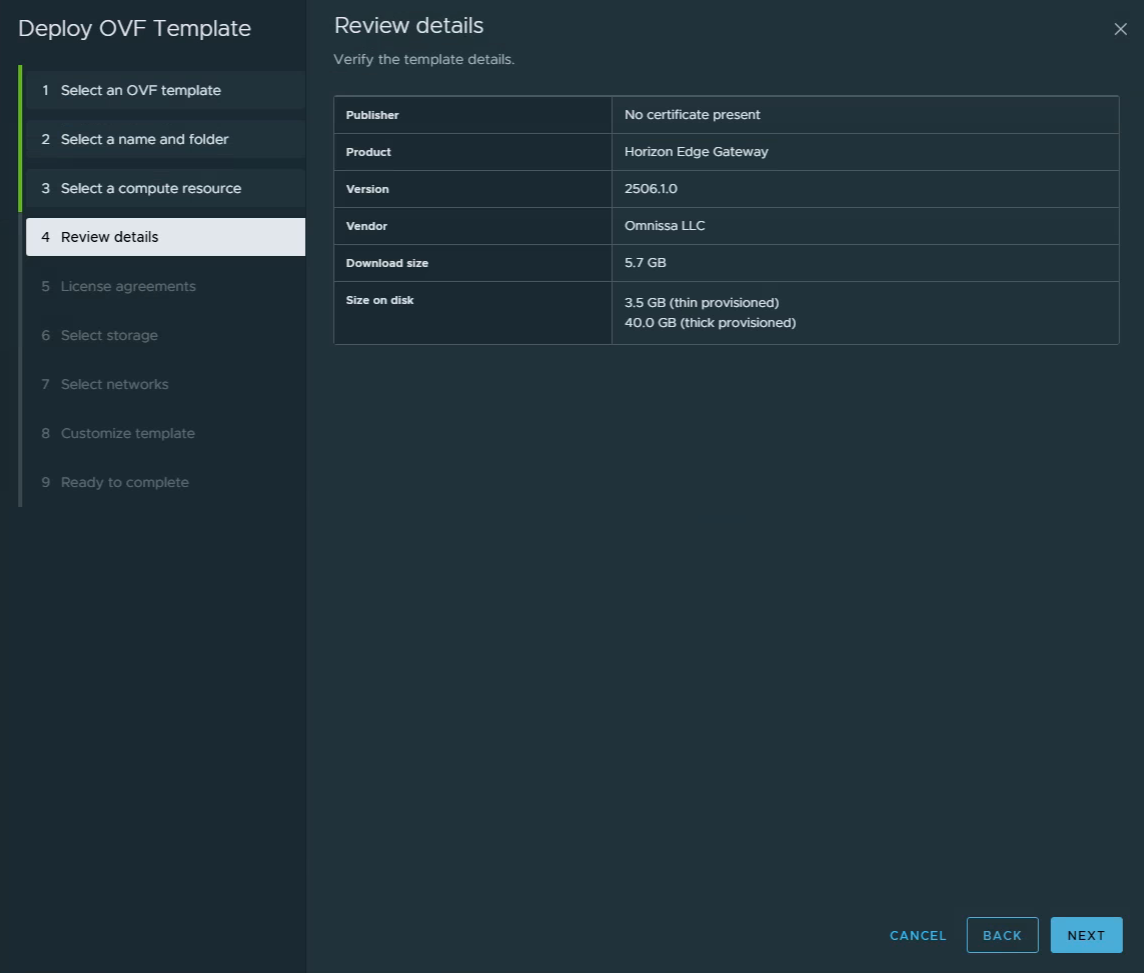
On the next window, validate the info is correct and click next.
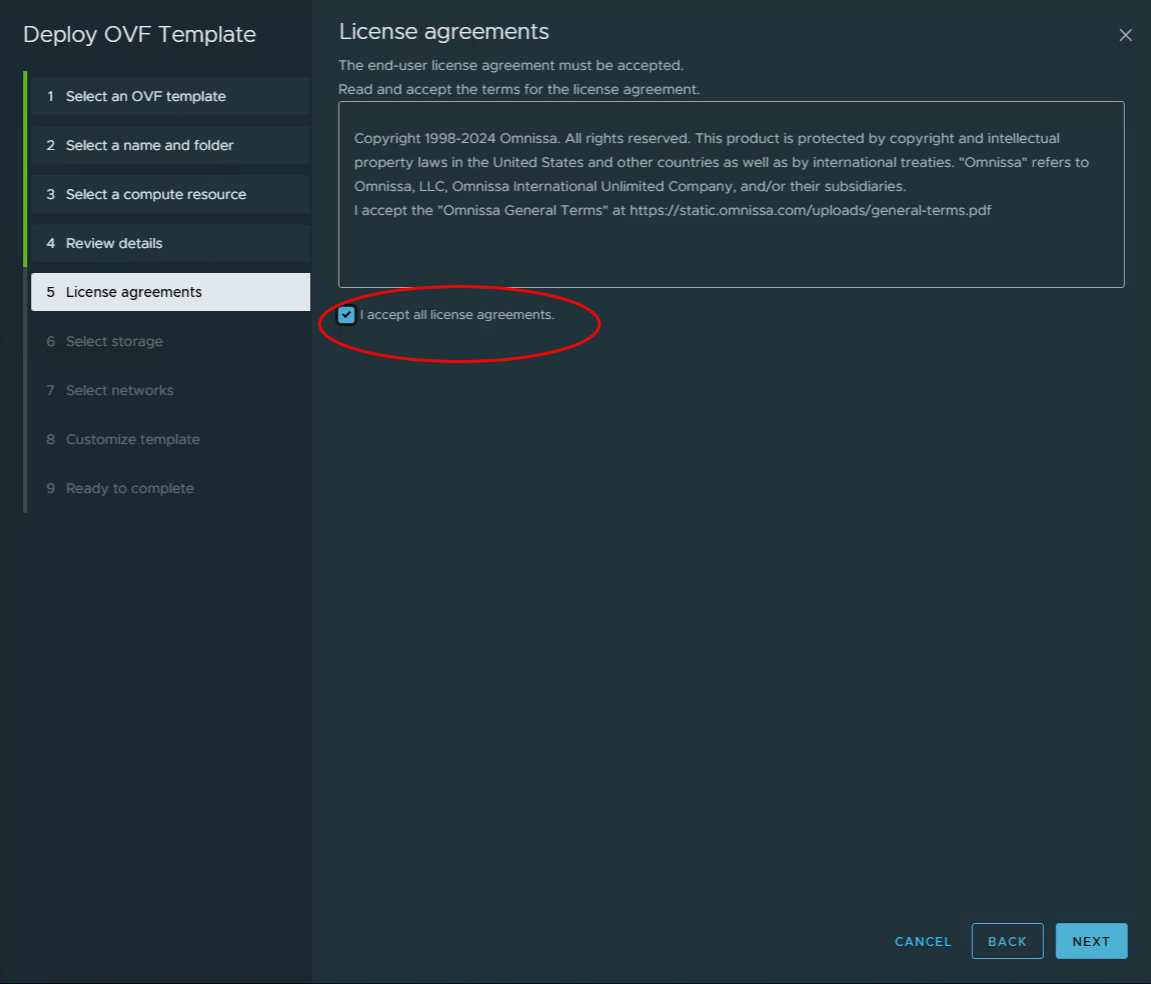
On the license agreement page, agree to the terms and conditions that no one really reads. Odds are they want your first born child. And click next
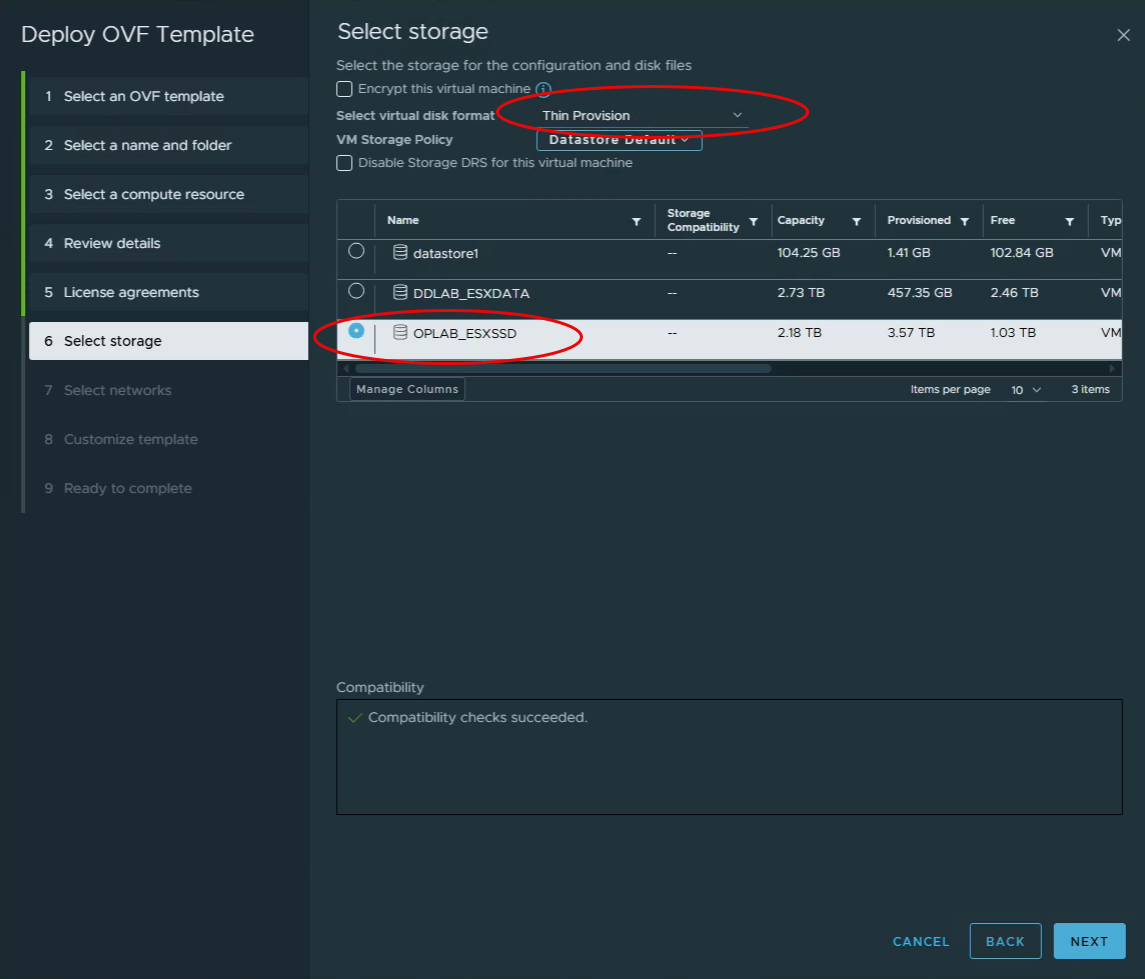
On the storage section, select the storage you want to deploy this Edge on, and for me I like to deploy things as “Thin Provisioned” so I changed the disk format to Thin. Then click next.
On the “Select Networks” options, Select your VLAN and Click Next.

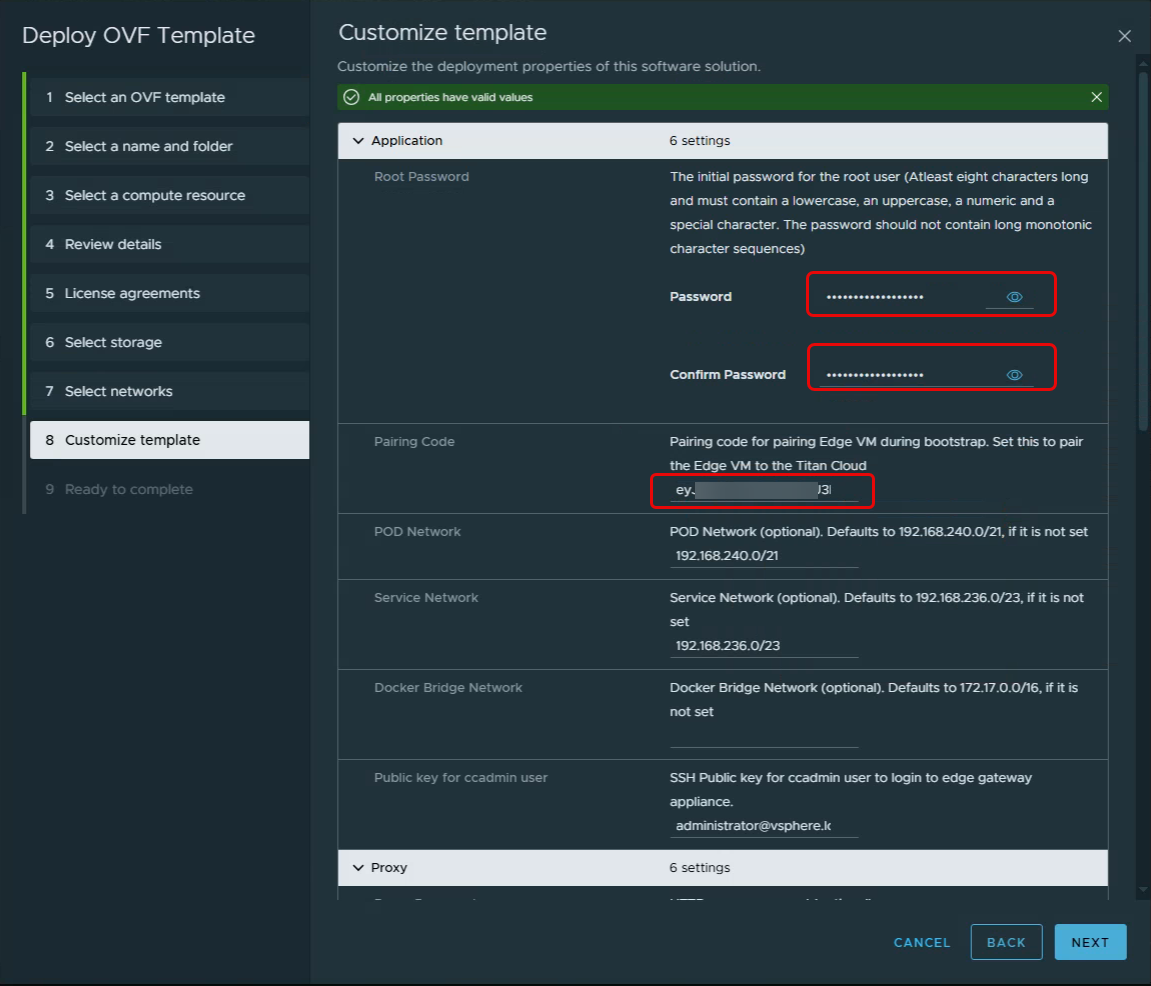
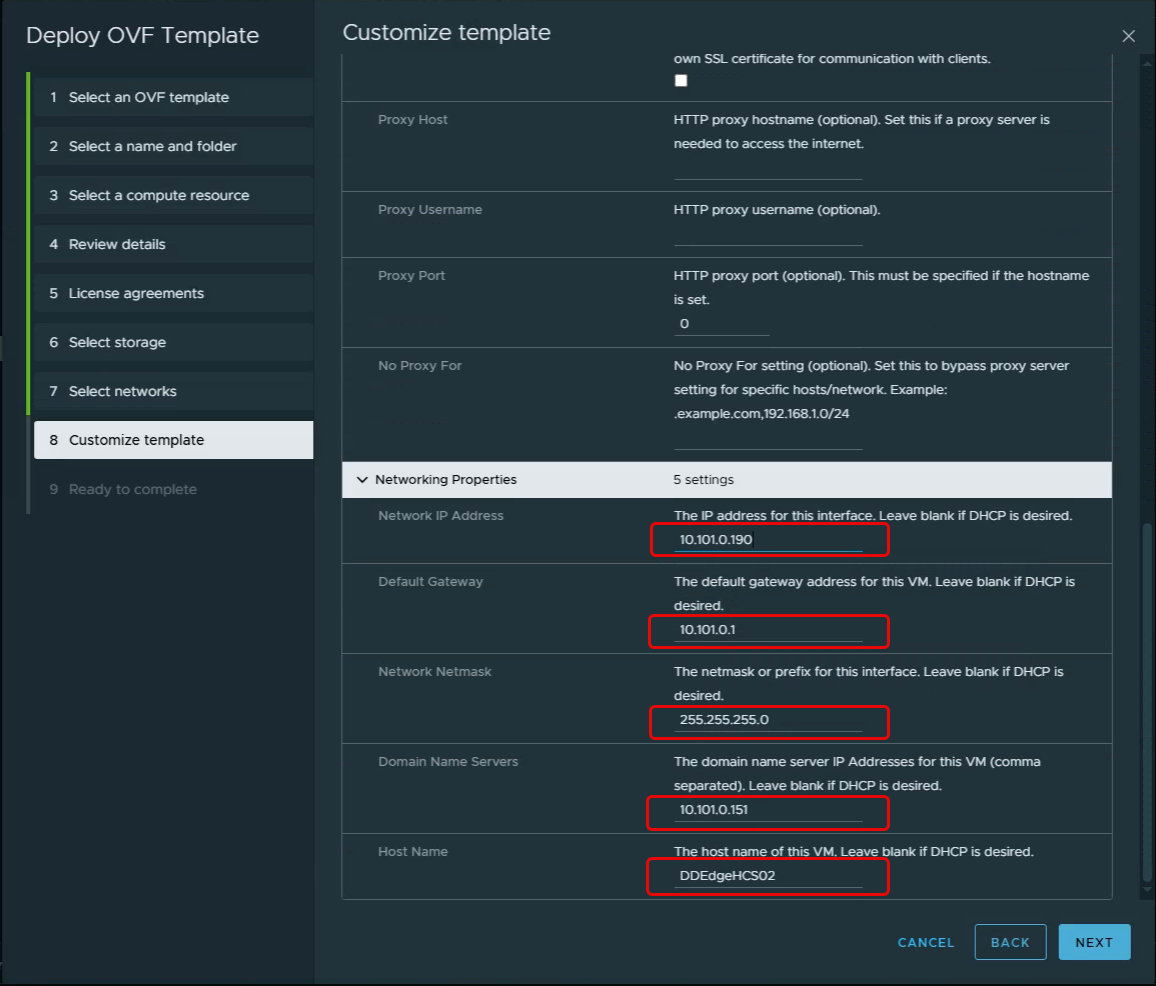
On the “Customize Template” section, set your Root Password and paste your pairing code you saved before. then scroll down to the bottom, there we will fill out “Network IP Address”, “Default Gateway”, “Network Mask”, “Domain Name Servers”, “Host Name” and click next.
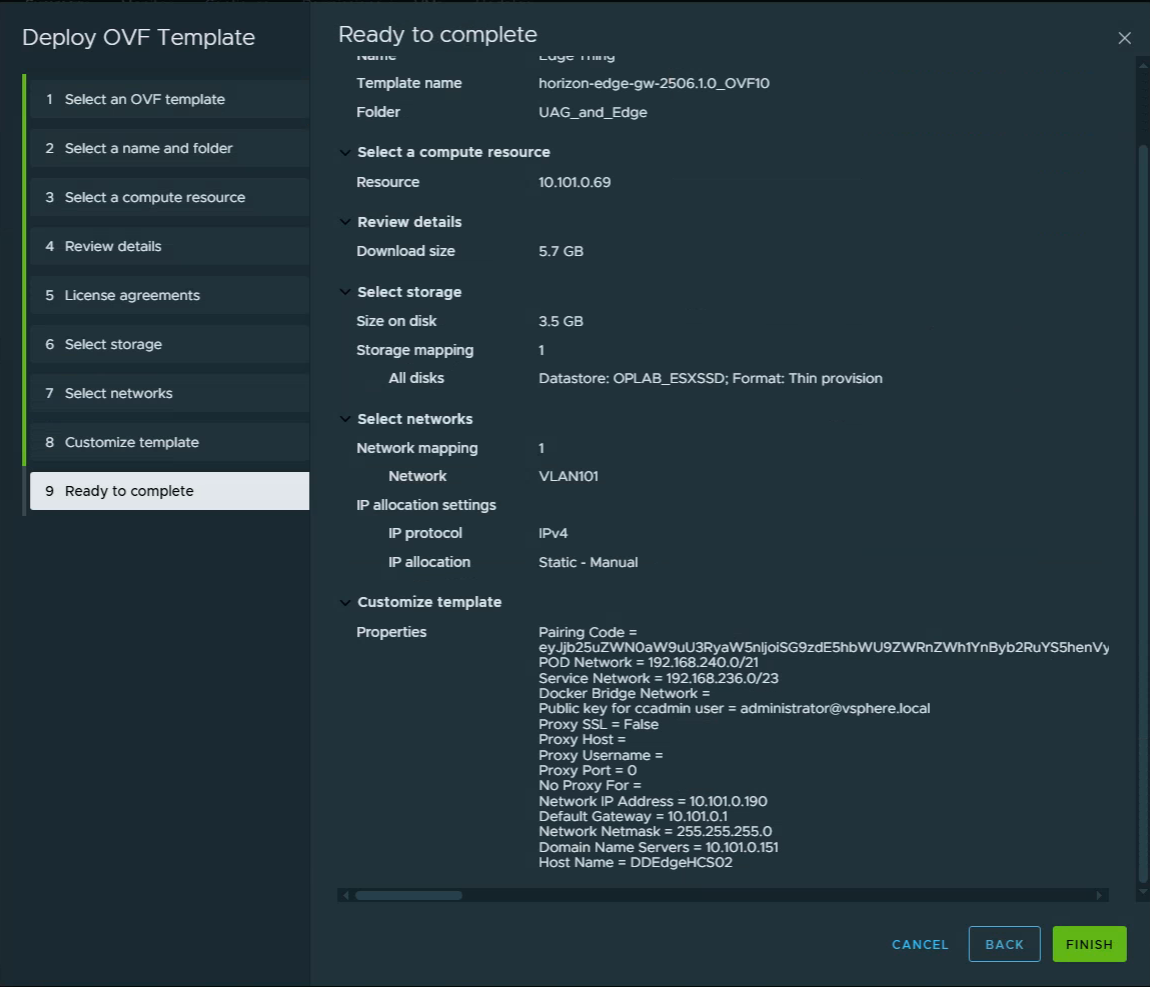
On the “Ready to Complete” tab validate the information is correct and click next.
Then wait for the Deployment of the OFA has been completed, and powered on. And wait for a long time for it to do its things.

Waiting:
You will be waiting for approximately 1 hour for the Edge gateway to fully register to the Horizon Cloud console. Documentation and Omnissa says it should take 15 minutes but I’m yet to see it.
Deploying a UAG:
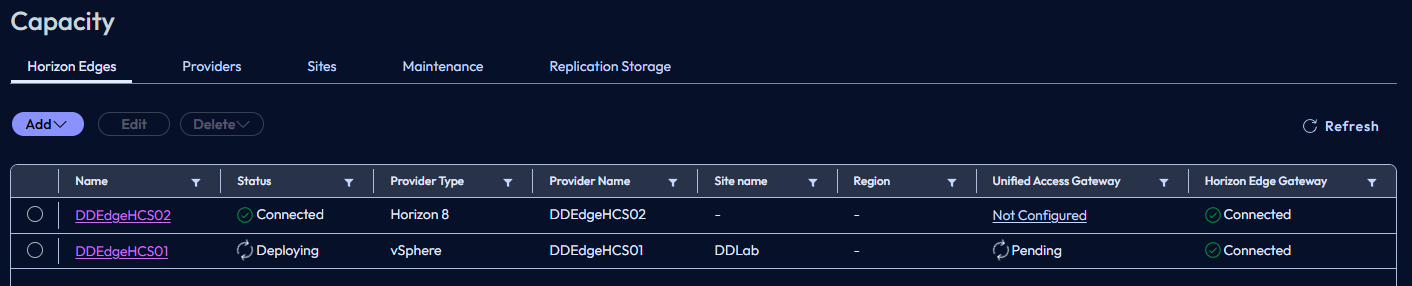
From the Horizon Cloud Console, under “Horizon Edges” find the Edge you want to deploy the UAG from, and Click the “Not Configured” link. Should look like below.

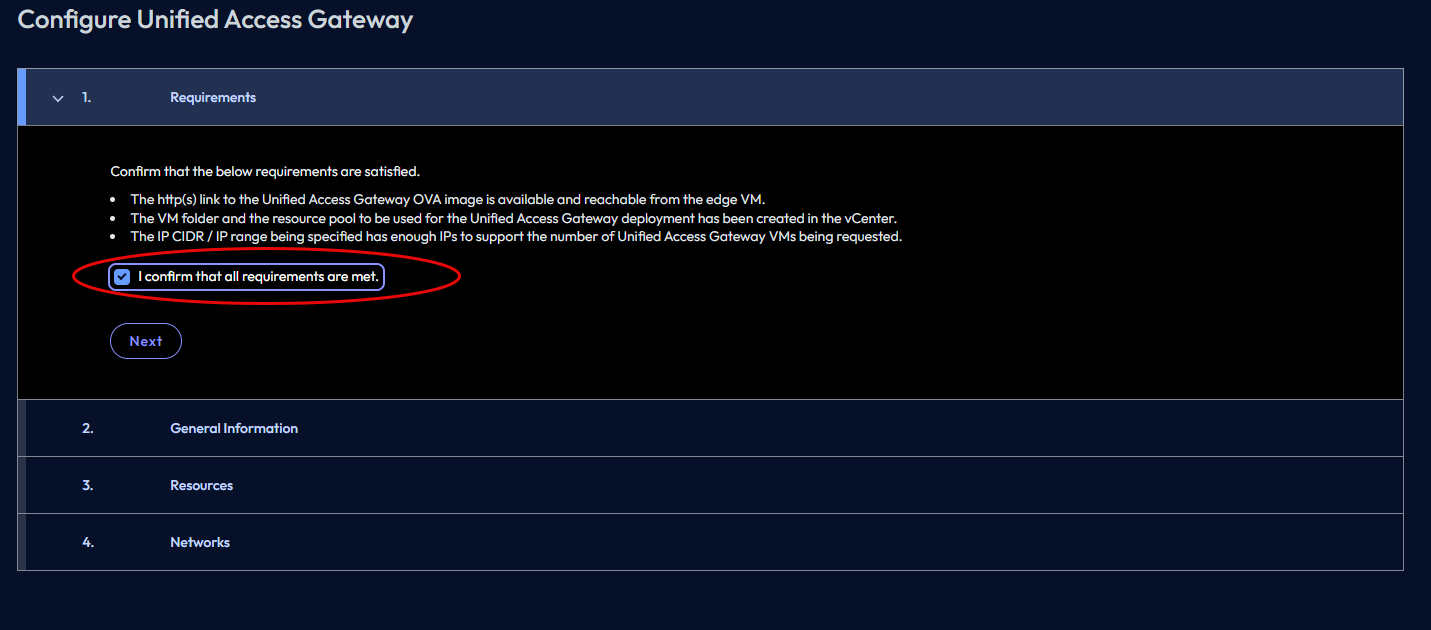
It will open a new Wizard, on Retirements section, click on Confirm all the requirements have been met. And put a check in the box next to “I Confirm….” and click next
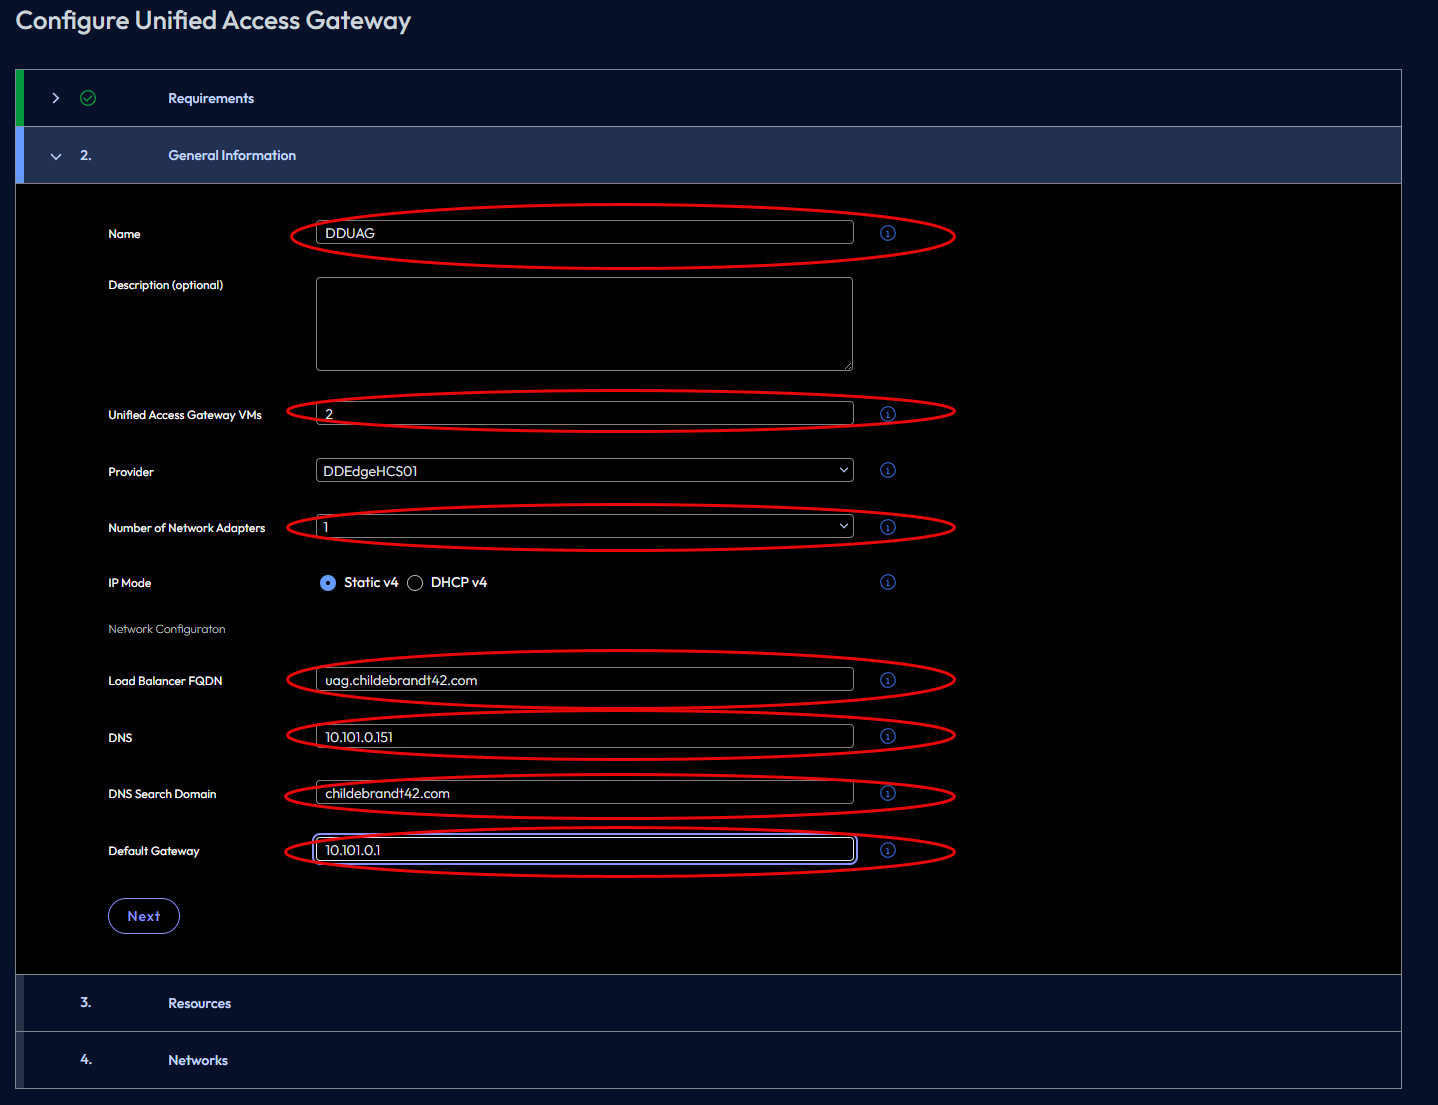
Fill out all of the following information circled, and click next
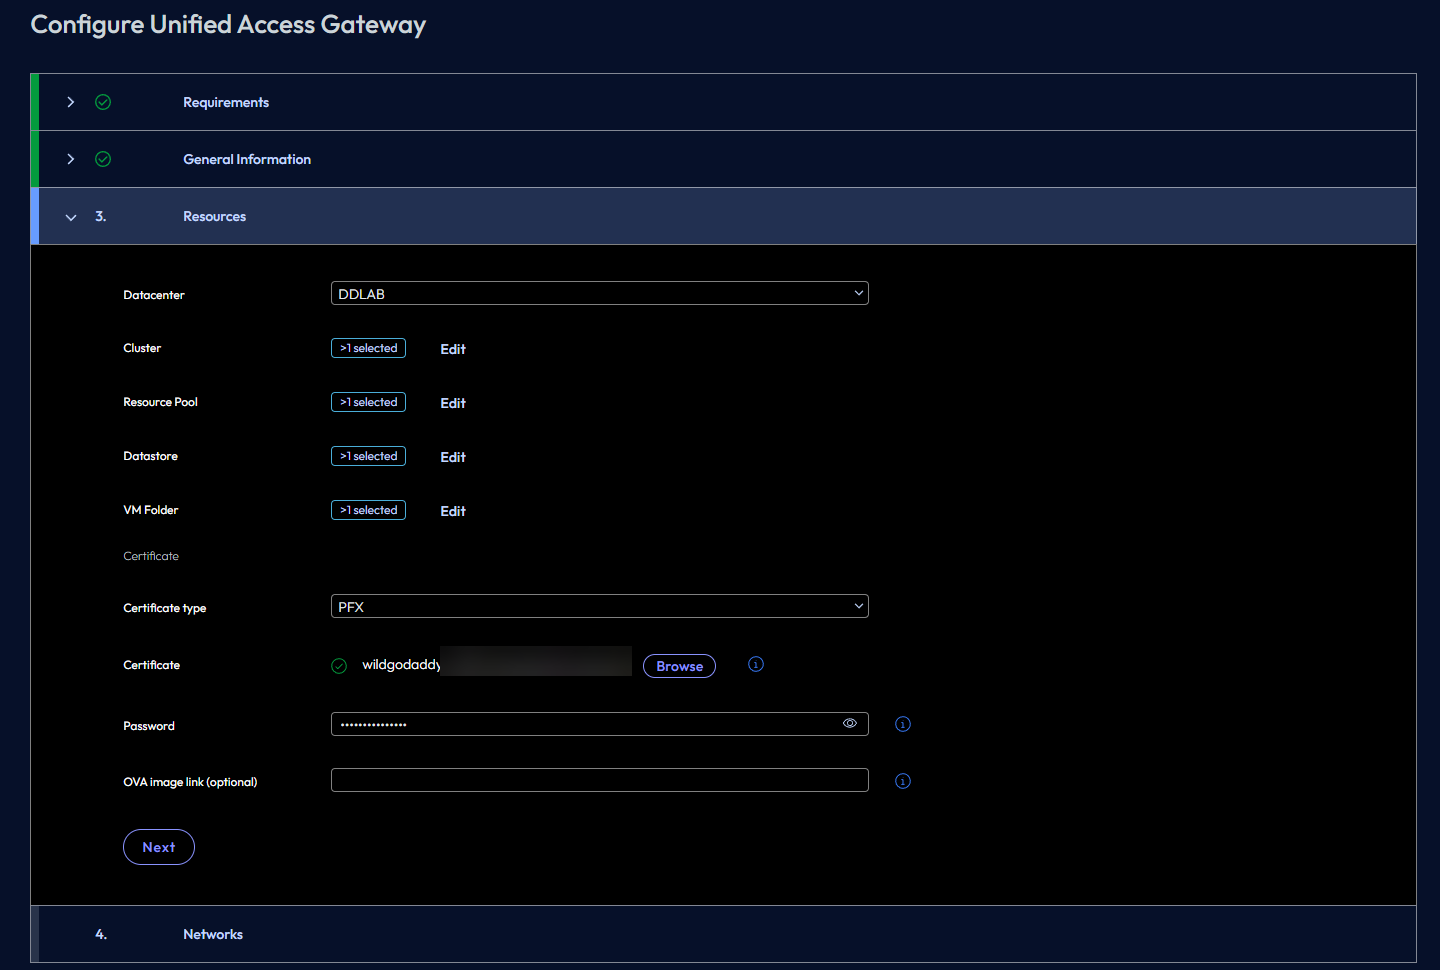
On the Resources Tab fill in the sections needed, and upload your certificate, for my example I used a PFX.
On the network tab, Enter your network information as needed, and click save.

It will start deploying the UAG on the connected vCenter.
Waiting:
Again this will take some time to build out and configure.
Failures:
Well this is the fun part of everything in the Horizon Cloud, in order to troubleshoot anything, you need to call support. The reason being, well you guessed it, there is no way to pull logs! Yea you can get them from the Edge Gateway in a terrible way, but thats about it. No logs from Failed UAG deployments. For example below.

Look into more details why they failed…

View Logs…Well kind of a pain to figure out why those are failing with that kind of log.
Try to Retry…

So in order to fix this, you need to delete your UAG deployment and start over again. Yep start over again with the UAG configuration and deployment.
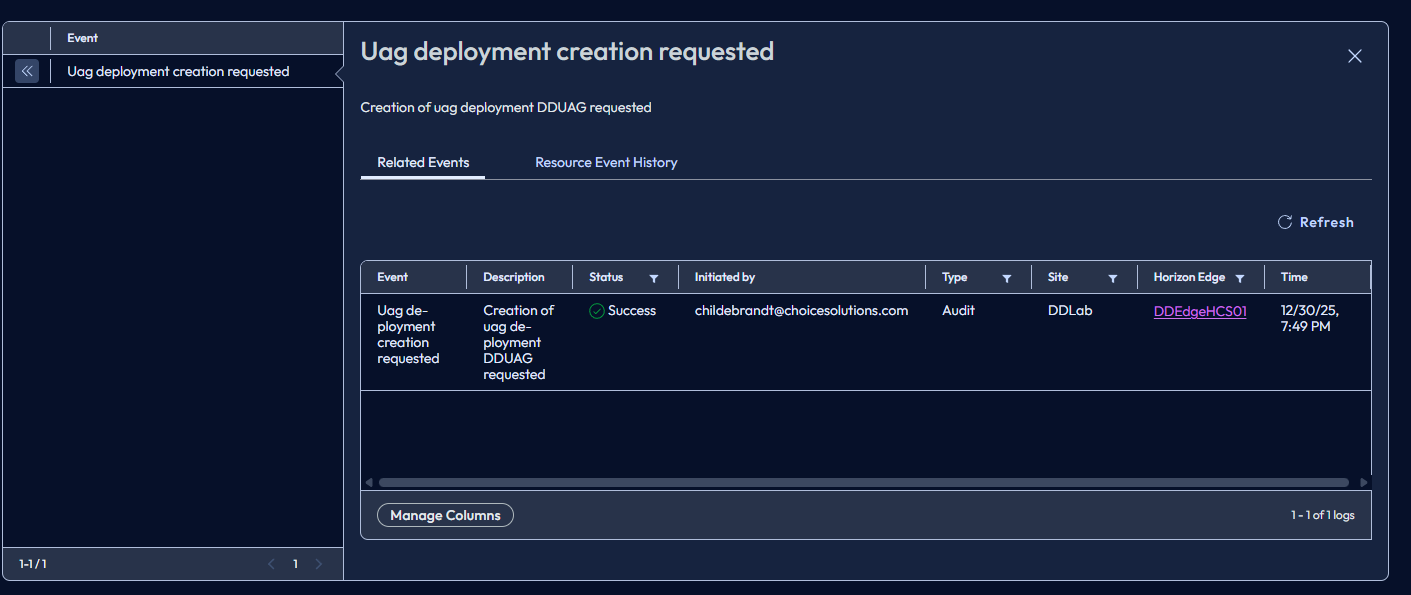
If you want to dig into logs look a bit lower and we will cover those.
Issues and Cons:
Long time to Deploy for Edge Gateway:
One thing worth calling out—because who doesn’t love a good wait?—the Edge Gateway takes its sweet time to fully deploy. We’re talking startup processes, syncing, and finally reporting back to the Horizon Cloud management plane like it’s on island time. Some times it has one to many drinks and just falls over and stumbles up to the room.
In my experience, you’re looking at upwards of an hour (sometimes more) before it graciously decides to play nice and work as intended. So go ahead, grab a coffee. Or lunch. Maybe start a new hobby. It’ll get there… eventually.
No Easily accessible logs:
There is no real way to pull logs. If you run into an issue logs are nowhere to be found. So if you run into an issue you have to call into support. Or….
Lack of HA Support:
Currently, there’s zero HA support for the Edge Gateway. Single point of failure? Check. But hey, do you really need it?
Right now the recommendation is to rely on vCenter HA or AHV HA to power on the VM if host fails. They are currently working on this for future road map.
One fun caveat to highlight: Lose that Edge Gateway, and SSO decides to take a vacation. Users get treated to the delightful experience of double authentication prompts until you bring it back online. (And yes, this amazing party trick works the same regardless of your SSO config. )
Nutanix Support:
So there is Nutanix Support, but its BETA at the moment, and yes im writing a blog on it. So there is good news for sure.
Second thing on the Nutanix support. If your intentions are to deploy the Edge Gateway to a AHV cluster, it only spits out a OVA, and in order to deploy the OVA into a AHV cluster you needed to extract the VMDK and go through a mess of a process to import it. (Yes they have a fix for it, later down the road.)
UAG’s only deploys VDI Cluster:
Here’s a delightful limitation: the Unified Access Gateways (UAGs) will only deploy successfully if the target vCenter that is defined in the Edge Gateway is the exact one hosting your VDI master images and desktop pools.
Do you have a Corporate policy that keeps all workload systems neatly segregated in a dedicated vCenter? Well in this current architecture, You’ll be forced to cram the UAGs right into the VDI vCenter instead of following Corporate policy.
Again I have brought this to Omnissa’s attention and the reasoning for why this might be an issue and they are working on building a fix for this.
Connecting to Horizon Desktop with On-Premises vCenter through Edge Gateway:
Current Approach
As an Omnissa client, you’ll start by connecting to the Horizon Universal Console and authenticating through your chosen Identity Provider (IdP). After authentication, you’ll see a Pool Group, which contains one or more pools. When you launch a pool, your session traffic is routed through your on-site Unified Access Gateways (UAGs), deployed by the Edge Gateway, and then you connect to your desktop.
Is this approach problematic? Not really—it’s just different. However, there is one significant drawback: if a UAG goes down, all sessions passing through that UAG will terminate. This is similar to today’s model, but typically external sessions are fewer than internal ones. In this design, all sessions—internal and external—go through the UAG, increasing dependency on its availability.
Alternative Approach
You can configure an Internal Pool Group using the Direct Access feature. This changes the connection method to behave more like traditional internal access:
- This provides connectivity similar to using Connection Servers.
- You still authenticate via the Horizon Universal Console.
- After authentication, the connection is made directly to the Horizon Agent, bypassing the UAG.
Considerations for Direct Access
- For external connectivity, you’ll need a second Pool Group, which could potentially double the number of desktops you manage. Yes that is extreme math, but its possible.
- Direct Access limits the pool group to internal-only connections.
- You must use the Horizon Client—HTML access is not supported due to browser limitations.
Omnissa is working a solution for this, but do not know the timeline of said thing.
Single Use Horizon Edges:
If you are deploying an Horizon Edge, there are many versions of them as of testing things. There is your traditional Edge, that is designed for your On-Premises Connection server traditional architecture.
There is one for HCS vCenter for allowing you to do Connection Serverless deployment on Premises.
There is also one for Openstack!
And now there is one for HCS for Nutanix (Beta) but still seperate deployment.
Yes they are all the same code source, but they can not be used to manage other things. You cant just deploy one Edge to use it 4 ways, you have to deploy 4 separate ones. Is this a big deal not really and most customers will not have all solutions, but they should be able to run multi functional.
Password Special Charter Issue
There is a delightful little undocumented bug lurking in the vCenter integration for your Edge Gateway service accounts (freshly confirmed just hours ago, because who needs documentation anyway?). If your password dares to include an “@” or a “#”, prepare for deployment chaos with your Unified Access Gateways (UAGs).
Lack Location Detail Issue
As highlighted earlier with the “Location” field—something I’ve been griping about for years in this V2 cloud nonsense—the problem rears its ugly head when you innocently type in a city like “Franklin.” Behold, it graciously presents a dropdown list… of exactly 15 options.
But wait—according to Copilot, there are no fewer than 28 cities named Franklin scattered across the US. Yet here we are, stuck with a measly 15, capped at “25 records” with a smug little message urging you to “refine your search.” Refine how, exactly? There’s no field for state, zip code, or even a polite hint. You’re left guessing: Is this your Franklin in Alabama? Indiana? Iowa? Who knows!
Sure, it’s supposedly using “region info” under the hood, but that’s cold comfort when the UI forces you into a game of “Google the full list and pick alphabetically by state.” Brilliant design, truly—because nothing says “user-friendly” like turning basic location selection into a geography quiz.
Omnissa is working on this, so soon there will finally be a fix.
Edge Gateway Thumbprint Shenanigans:
Ah, the Thumbprint field—where you paste in the certificate thumbprint from your vCenter web cert. But hold on to your hats, folks: you cannot use the modern, secure SHA256 version. Nope! You must use the delightfully retro SHA1 thumbprint instead. Because who doesn’t love a good step back to 2011-era cryptography? Sorry its a bit harsh, but its a big red security flag.
Redeploying UAG’s:
Oh, what a treat—if you hit a snag and need to delete your Unified Access Gateways (UAGs) to redeploy them, buckle up for an absolute carnival of fun. First, you get to meticulously remove every single pool from the Pool Groups (locally, of course). Then, joy of joys, delete all those pools entirely. And don’t forget the grand finale: wipe out every image mapped to the site.
Truly a streamlined, user-friendly process that screams much pain! Nothing like kicking off the day with an issue of a UAG and then having to add to that pain by manually dismantling half your configuration just to start over. Good times.
Again, Omnissa is aware of the issue, and is working on a fix.
Persistent or Manual Machine Support:
One of the visions I don’t understand and struggle with is the vision to go GA with this with no Persistent or Manual machine support.
For a platform that’s all about “wisdom” and “seamless, easy migration” (their words, not mine), the lack of support for persistent or manual desktops is truly a jaw-dropping oversight. There are a lot of companies that have not built out automated manual machines.
You can migrate your users, your apps, your dreams… but if you’re relying on good old persistent VDI machines? You might need to wait a few weeks before it becomes supported. Yes its in the works and will be here soon!
Omnissa Identity Service:
Pro Tip (with a wink): If you’re tempted to set Omnissa Identity Service as your primary Identity Provider in Horizon Cloud next-gen, resist the urge. It can break SSO spectacularly, leaving users staring at a double authentication prompt—like the system forgot they already logged in once. Stick to Microsoft Entra ID or another supported external IdP for smooth sailing, and layer on True SSO if you want that certificate magic for seamless desktop access. Trust me, your users will thank you (and so will your helpdesk). 🚀
App Volumes:
In this working iteration of Horizon Cloud and running with default configuration of App Volumes as VMDK deployment configuration App Volumes will not work, as the user logon process is not see via On-Premises AD structure, or via App Volumes server. Logically it should work if you convert everything to VHD but I have not had time to test this yet.
Summary:
What to say about all of this. Its amazing to see Omnissa jump into the Connection server less Horizon Cloud deployment functionality, comparable to Citrix’s DaaS. But yet it still has some work to do to get there. But wow has it made a huge leap from what it was. Excited to see where this is going.
There will be some more blogs around this in the future. Building out Pools, Pool Groups and so on.
Call out:
I do want to say huge thank you to the Omnissa Product team. I have had pretty much Daily calls and emails with them going over this product, and where the issues are, and my perspective on the product and what I see customers needing. So hats off for them in the help and the openness to feedback on this product line! So excited to see where this goes.

