
In the past I wrote an article about using Edge and Chrome to get the APIs for App Volumes. Well, it’s a little out of date and archived as release of this one.
Intro
Over the years VMware (Broadcom) has promised useful API documentation for App Volumes, but yet to come to life. So here is my version of some documentation on this. In case you are wondering VMware’s poor excuse of API documentation is here. There are a whopping 23 commands in there if you want to waste your time.
Back to my original article was based on a start that Chris Halstead created back in 2015 here. This was my start to getting into the APIs with 4.x App Volumes, 2.x and 4.x APIs are close, and some things change between them.
Assumptions
Before we get too deep into the woods of API’s, PowerShell and Developer tools. You need an understanding of the following:
- Understanding of what API’s are and how they work. Here is a great article from AWS on a ton of things around API’s: What is an API? – Application Programming Interface Explained – AWS (amazon.com)
- An understanding of how to use Chrome or Edge browser.
- How to use the basics of PowerShell
Discovery
Using Google Chrome or Microsoft Edge for me is the easiest way to for me to gather how the API’s work, and what some of them are. It’s a bit different from using Postman but get the same results in the end. So here is my second attempt to share some of that knowledge.
Developer Tools
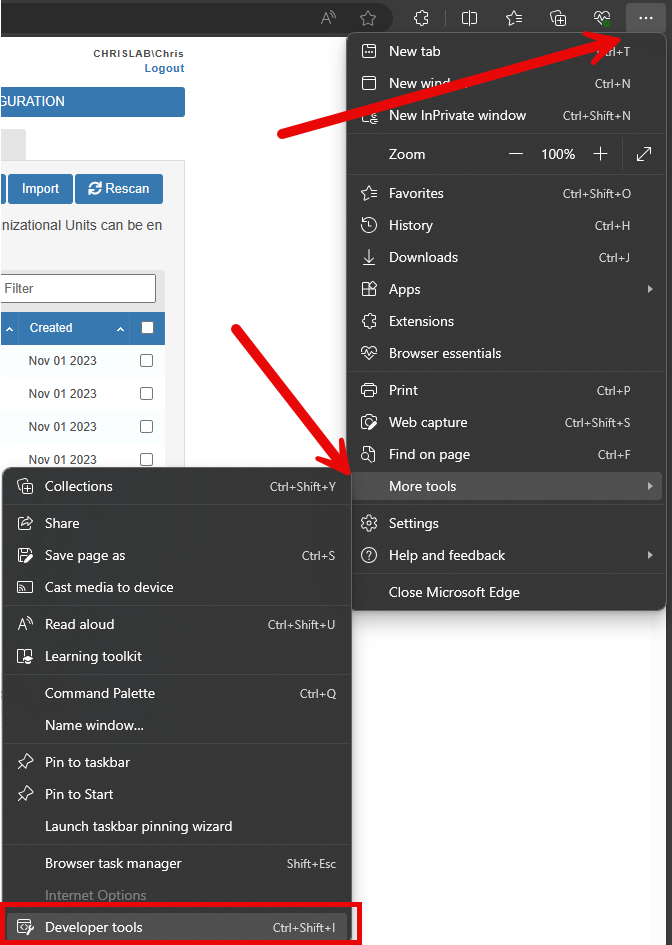
Let’s get started! If you open Chrome, browse to the App Volumes server you can click on the three dots in the upper right, go to More Tools, and then Developer Tools. Or Ctrl+Shift+I.
Once You have Developer mode open find the network tab. This is where I spend a ton of my time. This will show all the web calls of the webpage and allow you to decode how things are happening and learn how to decode the process. Should look like below:

The red button on the left is the Record button and the one next to it is the clear button. They will become your best friends. The other button is the Preserve Log check box. I like to have that on so I can see the whole chain as when things switch from frame to frame or from page to page it clears the log and you have a tendency to miss the thing you are wanting to see.
Now on your App Volumes Logon screen type your creds and hit log on with developer mode on and preserve log enabled. You will see all kinds of things. But really this does not help you with the logon process but shows you some of the process.

A few things we should cover is RestAPI Methods or Verbs. There are 5 verbs but I have only found we use 3 in AppVolumes, but here are the 5.
POST = Create
GET = Read Data
PUT = Update or replace
PATCH = Partial Update or Modify Data
DELETE = Voodo / Delete (Don’t use unless you are sure!)
There can be some more data found here on Rest Methods.
Launching Session with PowerShell
Well going back to 2015 Chris Halstead posted that in order to start a session with App Volumes manager via API you needed to follow a few things:
So, in PowerShell you would use something like this:
Invoke-RestMethod -SessionVariable SourceServerSession -Method Post -Uri "https://(AppVolumesServerFQDN)/cv_api/sessions" -Body $AppVolRestCredsLet’s break this command up a bit. Invoke-RestMethod is a built-in function of PowerShell introduced in 3.0. It allows you to run rest commands directly from PowerShell. More Info Here!
-SessionVariable = This is the command we are using to save the session cookie. Notice we are not using a defined variable. But it is creating the variable called “SourceServerSession” for use going forward. And future commands you just add the $SourceServerSession variable for the -SessionVariable
As we dig into the API viewer in Chrome you will see things displayed a bit different in the URL as it won’t include cv_api. That is because by default the URL for Sessions is https://(AppVolumesServerFQDN)/sessions but that will do you no good for doing anything useful with the data. As its being displayed as HTML code.

But if you add the “cv_api” to it, it will change it from HTML to JSON/Text output allowing you to read and parse the data for other automations. So same URL https://(AppVolumesServerFQDN)/cv_api/sessions with the “cv_api” in it will allow you to get JSON data out of it.
URL = https://(AppVolumesServerFQDN)/cv_api/sessions enter your AppVolumes server FQDN and lets see how well it goes.
-Body = Oh wait forgot to tell you about the creds. I found this out the hard way after trial and error a bit. You must use Clear text Username and Password (if someone knows of another way, please let me know) so this is what I do typically.
Credentials
# Get Credentials
$Credentials = Get-Credential
$RESTAPIUser = $Credentials.UserName
$RESTAPIPassword = $Credentials.GetNetworkCredential().password
$AppVolRestCreds = @{
    username = $RESTAPIUser
    password = $RESTAPIPassword
}
This will form the credentials portion of the body correctly and allow you to authenticate session.
Now you can authenticate like below. Once you establish a session cookie it will look like below slowing:
Success
OK

From this point forward you can start doing other things in the App Volumes Manager as you have an authenticated session cookie saved. If you check the session cooking by typing: $SourceServerSession as that was what we used as a variable to save it in it will look something like below:

Getting App Volumes version
Here is my method. As explained, I like the function of Invoke-RestMethod so to get Version data in PowerShell it would look something like this:
Invoke-RestMethod -WebSession $SourceServerSession -Method Get -Uri https://(AppVolumesServerFQDN)/cv_api/versionNotice this time we called the variable “$SourceServerSession” as we want to use the session cookie, and we did not use the credentials body as we already have an authenticated session. And last thing you notice we switched the Method to “Get”. As we are getting data from the API. For more info on Rest Verbs Look here! Your output should look like below:

Where did I get that URL from though, well this one is in the API documentation, but it is also in Chrome/Edge’s Developer tool. On the main page after you log into app volumes it will show the Dashboard tab, on the left side of the developer’s tab, scroll down till you see “Version” and click on it. You will see something like:

As you can see in the developer tools you can see the URL I used in my command, “https://appvol.chrislab.local/cv_api/version” And you also notice that we are using GET method to get the information. You can do the same thing for many commands, just by browsing a few pages in App Volumes and looking around. We will circle back to that a bit later. Let’s dive into some of the commands Chris acquired for us.
Most of the stuff Chris has called out in his blog about this still works today in the 4.x, the core calls work and the 2.x functions work but the 4.x they decided to change a ton of this stuff. And working with PowerShell you can just substitute the URL found in his blog with the Invoke-Reset command used for getting version data. One exception to this that is the URL for Online, under the Directory tab, you will find that the URL for this is “Https://AppVolServerFQDN/Directory” but that will not work, you must add a “cv_api” in there. Let’s dig a bit deeper below.
Online Entities
If you look in your Online Entities URL it’s like: “Https://AppVolServerFQDN/Directory”
But if you look at your developer tools, you will see a call for “online_entities” actually you will see two. If you click on the first one “online_entities” it will look like below:
Invoke-RestMethod -Websession $AppVolSession -Method Get -Uri https://(AppVolumesServerFQDN)/cv_api/online_entities”You Know you can take my word these records exist but that is not what this post exists for. Now let’s open your AppVolumes URL to Directory and then Online. Now open your developer tab. Then click on the online tab to refresh the page. It should look something like below:
But if you try to run the command, well, you will get HTML code back. Looking something like this:

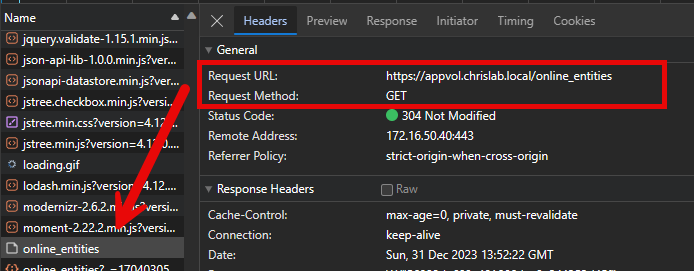
Well we dont want HTML code back, we want the JSON data. So how do we get that data, Well click on the second “online_entities?” with the question mark, now you will see the API URL!

Now we know the URL, we can do some digging. As you can see, the URL for the API is “Https://AppVolServerFQDN/cvi_api/online_ent” but why does it have the “?_=1704030596278” well that a random number at the end to prevent the browser from caching the page and force reload each time. So, let’s cut that off and run the command below:
Invoke-RestMethod -Websession $SourceServerSession -Method Get -Uri https://(AppVolumesServerFQDN)/cv_api/online_entities
And we get data back! Yea, now we can save that into a Variable and start digging deeper, for me I’m going to save this to a variable called “$Online” like below:
$Online = Invoke-RestMethod -Websession $SourceServerSession -Method Get -Uri https://(AppVolumesServerFQDN)/cv_api/online_entitiesWell after running the command, you realize that Online Entities is nested a few levels down, so let’s drill till we can find the data we are looking for.
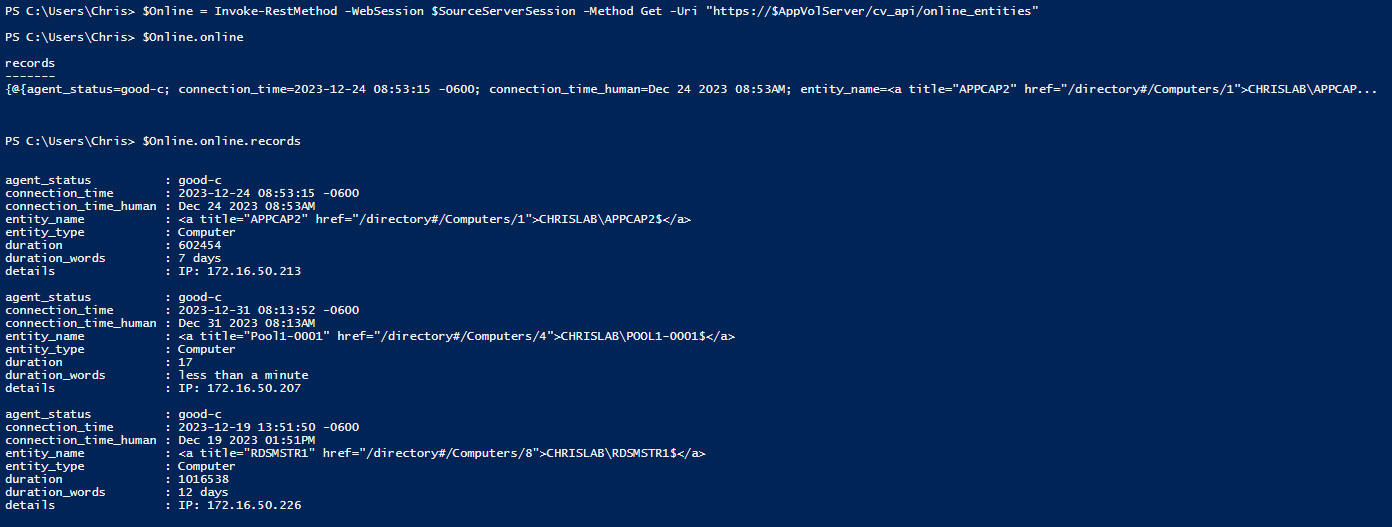
Well in order to get the data we needed you needed to run “$Online.Online,records” to get the data you were looking for.
Get AD Settings
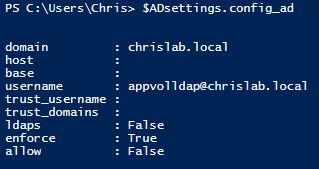
Invoke-RestMethod -Websession $SourceServerSession -Method Get -Uri https://(AppVolumesServerFQDN)/cv_api/ad_settingsBut as you see below the format is in JSON so easy way to deal with it is to save the contents to a variable.

Now if you save the contents to variable $ADsettings by putting $ADSettings = in front of the command. You can now drill down into “Config_AD” and see what it has to offer:
I think you all have a handle on the Get functions lets dive way down the rabbit hole.
Dive into Put and Post
Now that we have covered all the boring Get info stuff lets go off the deep end a start causing damage. Lets head off to the Put and Post world. This where things begin to get interesting.
The variable $GroupID is the ID number of the group you want to import. So if you use the command from above to get Storage groups put it into a variable this will allow you to parse it. Using something like below:
$StorageGroups = Invoke-RestMethod -Websession $AppVolSession -Method Get -Uri "https://(AppVolumesServerFQDN)/cv_api/storage_groups"From there you can type $StorageGroups.Storage_Groups and it will tell you all the storage groups with full details. From there you can use $StorageGroups.storage_groups.id and it will tell you all the storage group ID’s out there. And from there when you now the Group IDs you can do things like Import, Replicate and Rescan.
You can see below the name and ID. AppVolumes calls all the changes via Group ID. As you see my Group ID is “1”

For the examples below $GroupID is the ID of the storage group you want to do something with.
Import from Storage Group
Invoke-RestMethod -Websession $AppVolSession -Method Post -Uri https://(AppVolumesServerFQDN)/storage_groups/$GroupID/importReplicate Storage Group
Invoke-RestMethod -Websession $AppVolSession -Method Post -Uri "https://(AppVolumesServerFQDN)/storage_groups/$GroupID/replicate"Rescan
Invoke-RestMethod -Websession $AppVolSession -Method Post -Uri “https://(AppVolumesServerFQDN)/cv_api/storage_groups/$GroupID/rescan”
And if you want to do something with all the storage groups you can throw in my favorite thing the For loop. So example like this:
foreach($GroupID in $StorageGroups.Storage_Groups.ID){

    Invoke-RestMethod -Websession $AppVolSession -Method Post -Uri "https://(AppVolumesServerFQDN)/storage_groups/$GroupID/import"

    Invoke-RestMethod -Websession $AppVolSession -Method Post -Uri "https://(AppVolumesServerFQDN)/storage_groups/$GroupID/Replicate"

    Invoke-RestMethod -Websession $AppVolSession -Method Post -Uri "https://(AppVolumesServerFQDN)/cv_api/datastores/rescan"

}
This will Import, Replicate and Rescan each of the storage groups.
Working with Applications. In working with applications you need to get a bunch of data before you can do things with it. Using your learning from above you need to get things like “Package ID” and “Lifecycle ID”
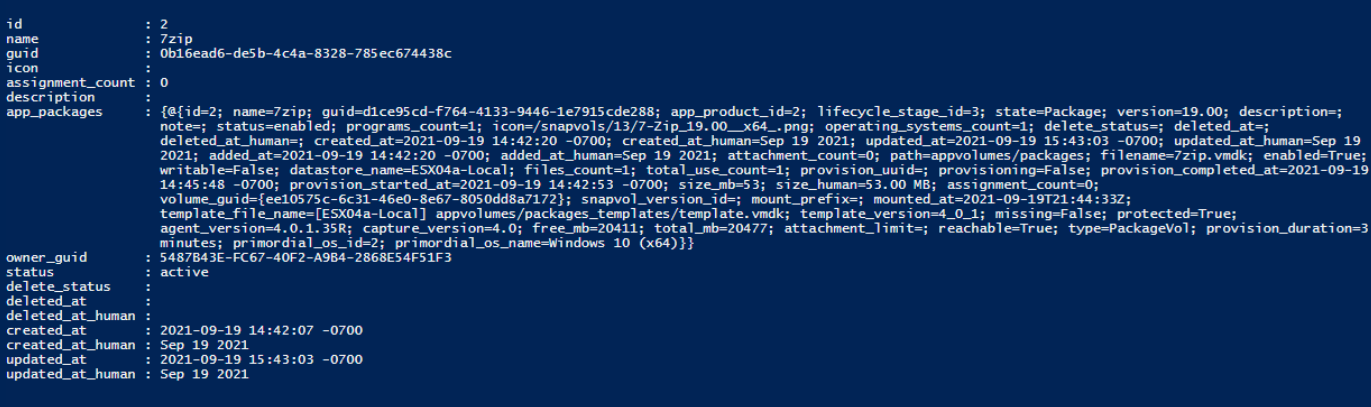
Get Package Data from Source and Target
$Packages = (Invoke-RestMethod -WebSession $AppVolSession -Method get -Uri "https://( AppVolumesServerFQDN)/app_volumes/app_packages?include=app_markers%2Clifecycle_stage%2Cbase_app_package%2Capp_product").dataNoticed I put “().data” around the command. That is to get your right inside the data subset. If you look at the variable “$Packages” it will hold all the data of your packages. Will look something like below, Notice my package ID is “2”.

Next thing you will need is Lifecycle Data. Really this is the Lifecycle master DB. Yes it changes between versions and is growing.
$Lifecycle = (Invoke-RestMethod -WebSession $AppVolSession -Method get -Uri "https://(AppVolumesServerFQDN)/app_volumes/lifecycle_stages").dataAgain going right into the data and saving to a variable.
Below is the base command to set the Lifecycle of any Package.
Set Lifecycle Data
Invoke-RestMethod -WebSession $AppVolSession -Method put -Uri "https://(AppVolumesServerFQDN)/app_volumes/app_packages/$($Package.id)?data%5Blifecycle_stage_id%5D=$($Lifecycle.id)"But lets take this to my example. I want to set my package “2” to Published. So in order to do that we can do that with variables or with just numbers. Below is the example with variables. Variables work nice when you are want to do many of these things. And if you want to do a huge set just throw it in a for loop.
Below we are setting the Package “7zip” or ID “2” to “Published” that equals “3” in the AppVolumes DB.
$Package = ‘2’
$LifeCyclePublished = ‘3’

Invoke-RestMethod -WebSession $AppVolSession -Method put -Uri "https://(AppVolumesServerFQDN)/app_volumes/app_packages/$($Package.id)?data%5Blifecycle_stage_id%5D=$($LifecyclePublished)"
Now pull the package’s again, and it will show updated Lifecycle Stage ID. Like below:

Now lets take the same Package, And lets set it as current as its our production package. The below command will set it as current.
Set Source Current Status
Invoke-RestMethod -WebSession $AppVolSession -Method put -Uri "https://(AppVolumesServerFQDN)/app_volumes/app_products/$($Package.app_product_id)/app_markers/CURRENT?data%5Bapp_package_id%5D=$($Package.id)"Well congrats you just set the Package as Current. Now if you Get the package data again you will see something like below: (The Current marker is hidden under the “App_Marker”)

Below is broken out “App Markers”.

Now lets work on the fun mess of Assigning users. This one threw me through a loop for a few hours then it just clicked. It did take some help from Chris. I think the email said something like “Im so confused on assigning a user and can’t make it work. HELP!, can you give me a hint on how to make this work, not the answer!” Something to that extent, as cant find the email anymore. But for assigning users there are some specific data you need. The key parts you need to assign a user are the following:
- App Product ID
- Entities
- Path
- Entity Type
- App Package ID
- App Marker ID
-App Product ID – This comes from the Products. Below is the command to get Products.
Get Product Data from Source and Target
$Products = (Invoke-RestMethod -WebSession $AppVolSession -Method get -Uri "https://$AppVolServer/app_volumes/app_products").dataYou will need to use a for loop to get this to a single product. Or you can just use the $Products.ID value. Below is an excerpt of my $Product variable.
-Entities (Who you are assigning and has to match specific form) This is a fun one, but in order to assign a user it HAS to be in this format:
CN=AD User,CN=User,CN=Users,DC=corp,DC=local
Now if you have OU’s you need to add all that fun stuff in there too.
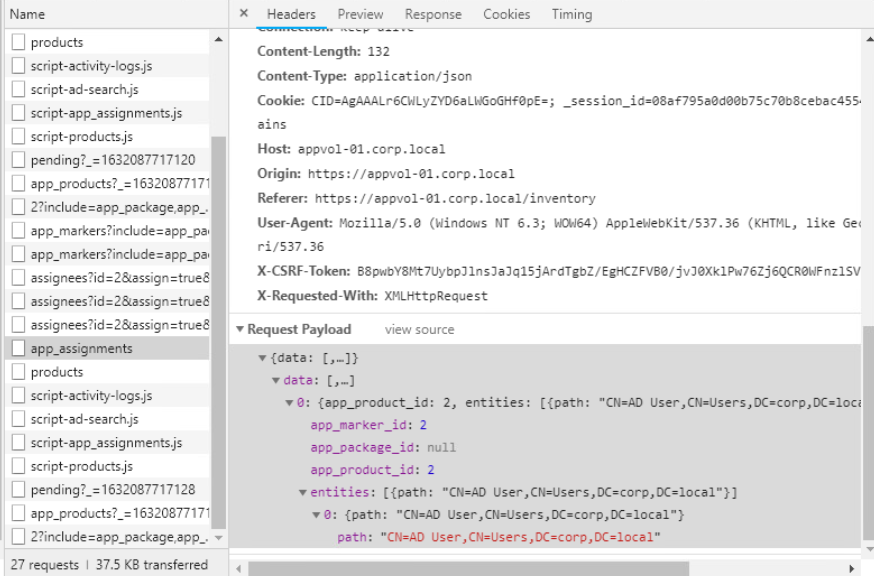
Easy way to see this is to do the assignment with the Development tab open, once you hit complete find the call named “app_addignments” and click on that scroll all the way to the bottom and expand all the stuff under “Request Payload”
It will look something like this:
-Path = Meaning is it a User or Group
-Entity Type – This is either “User” or “Group”
-App Package ID – Can use “null” if you are not assigning to a package ID and just using current. For 90% of the people out there you are not assigning groups or users directly to a Package you are assigning it to the package marked as “Current”. If that is your case you can use “null”.
-App Marker ID – This is the Application Marker ID. This comes from the Packages, and we are just using the value $Package.app_markers.id
Below we are building the Body for the assignment. This is the part that messed me up with the whole thing. Until I realized that in the Developer tab it gave me the answer. If you look at the Payload Break down it gives you the answer. Then you just need to translate it a bit.

From there you build this:
# Assign User to AppStack
$AssignUserOrGroup = “CN=AD User,CN=Users,DC=corp,DC=local”
$EntityType = “Group”
$AssignmentJsonBody = "{""data"":[{""app_product_id"":$($Product.id),""entities"":[{""path"":""$AssignUserOrGroup"",""entity_type"":""$EntityType""}],""app_package_id"":null,""app_marker_id"":$($Package.app_markers.id)}]}"
Now that you have the body built you can assign the user! That part is simple.
Invoke-RestMethod -WebSession $AppVolSession -Method Post -Uri "https://(AppVolumesServerFQDN)/app_volumes/app_assignments" -Body $AssignmentJsonBody -ContentType 'application/json'Then to unassign you can just find out the Assignment ID from the commands we covered early and boom. User is unassigned.
Un-assign user to AppStack
Invoke-RestMethod -WebSession $AppVolSession -Method Post -Uri "https://(AppVolumesServerFQDN)/app_volumes/app_assignments/delete_batch?ids%5B%5D=$($Assignment.id)"As you can see there are a ton of things you can do with API, also in discovery with the developer tools inside Chrome/Edge. Thank you for making it this far.

